Connecting API Gateway to a Private API Gateway cross account
A question that often comes up is how to connect one API Gateway to another. Particularly cross AWS account with a central public API Gateway as the front door, and behind it multiple private API Gateways fronting a set of microservices.
Why? Because this pattern allows different development teams to build and publish their serverless applications in their own accounts as well as provide a central front door to apply governance, security and monitoring.
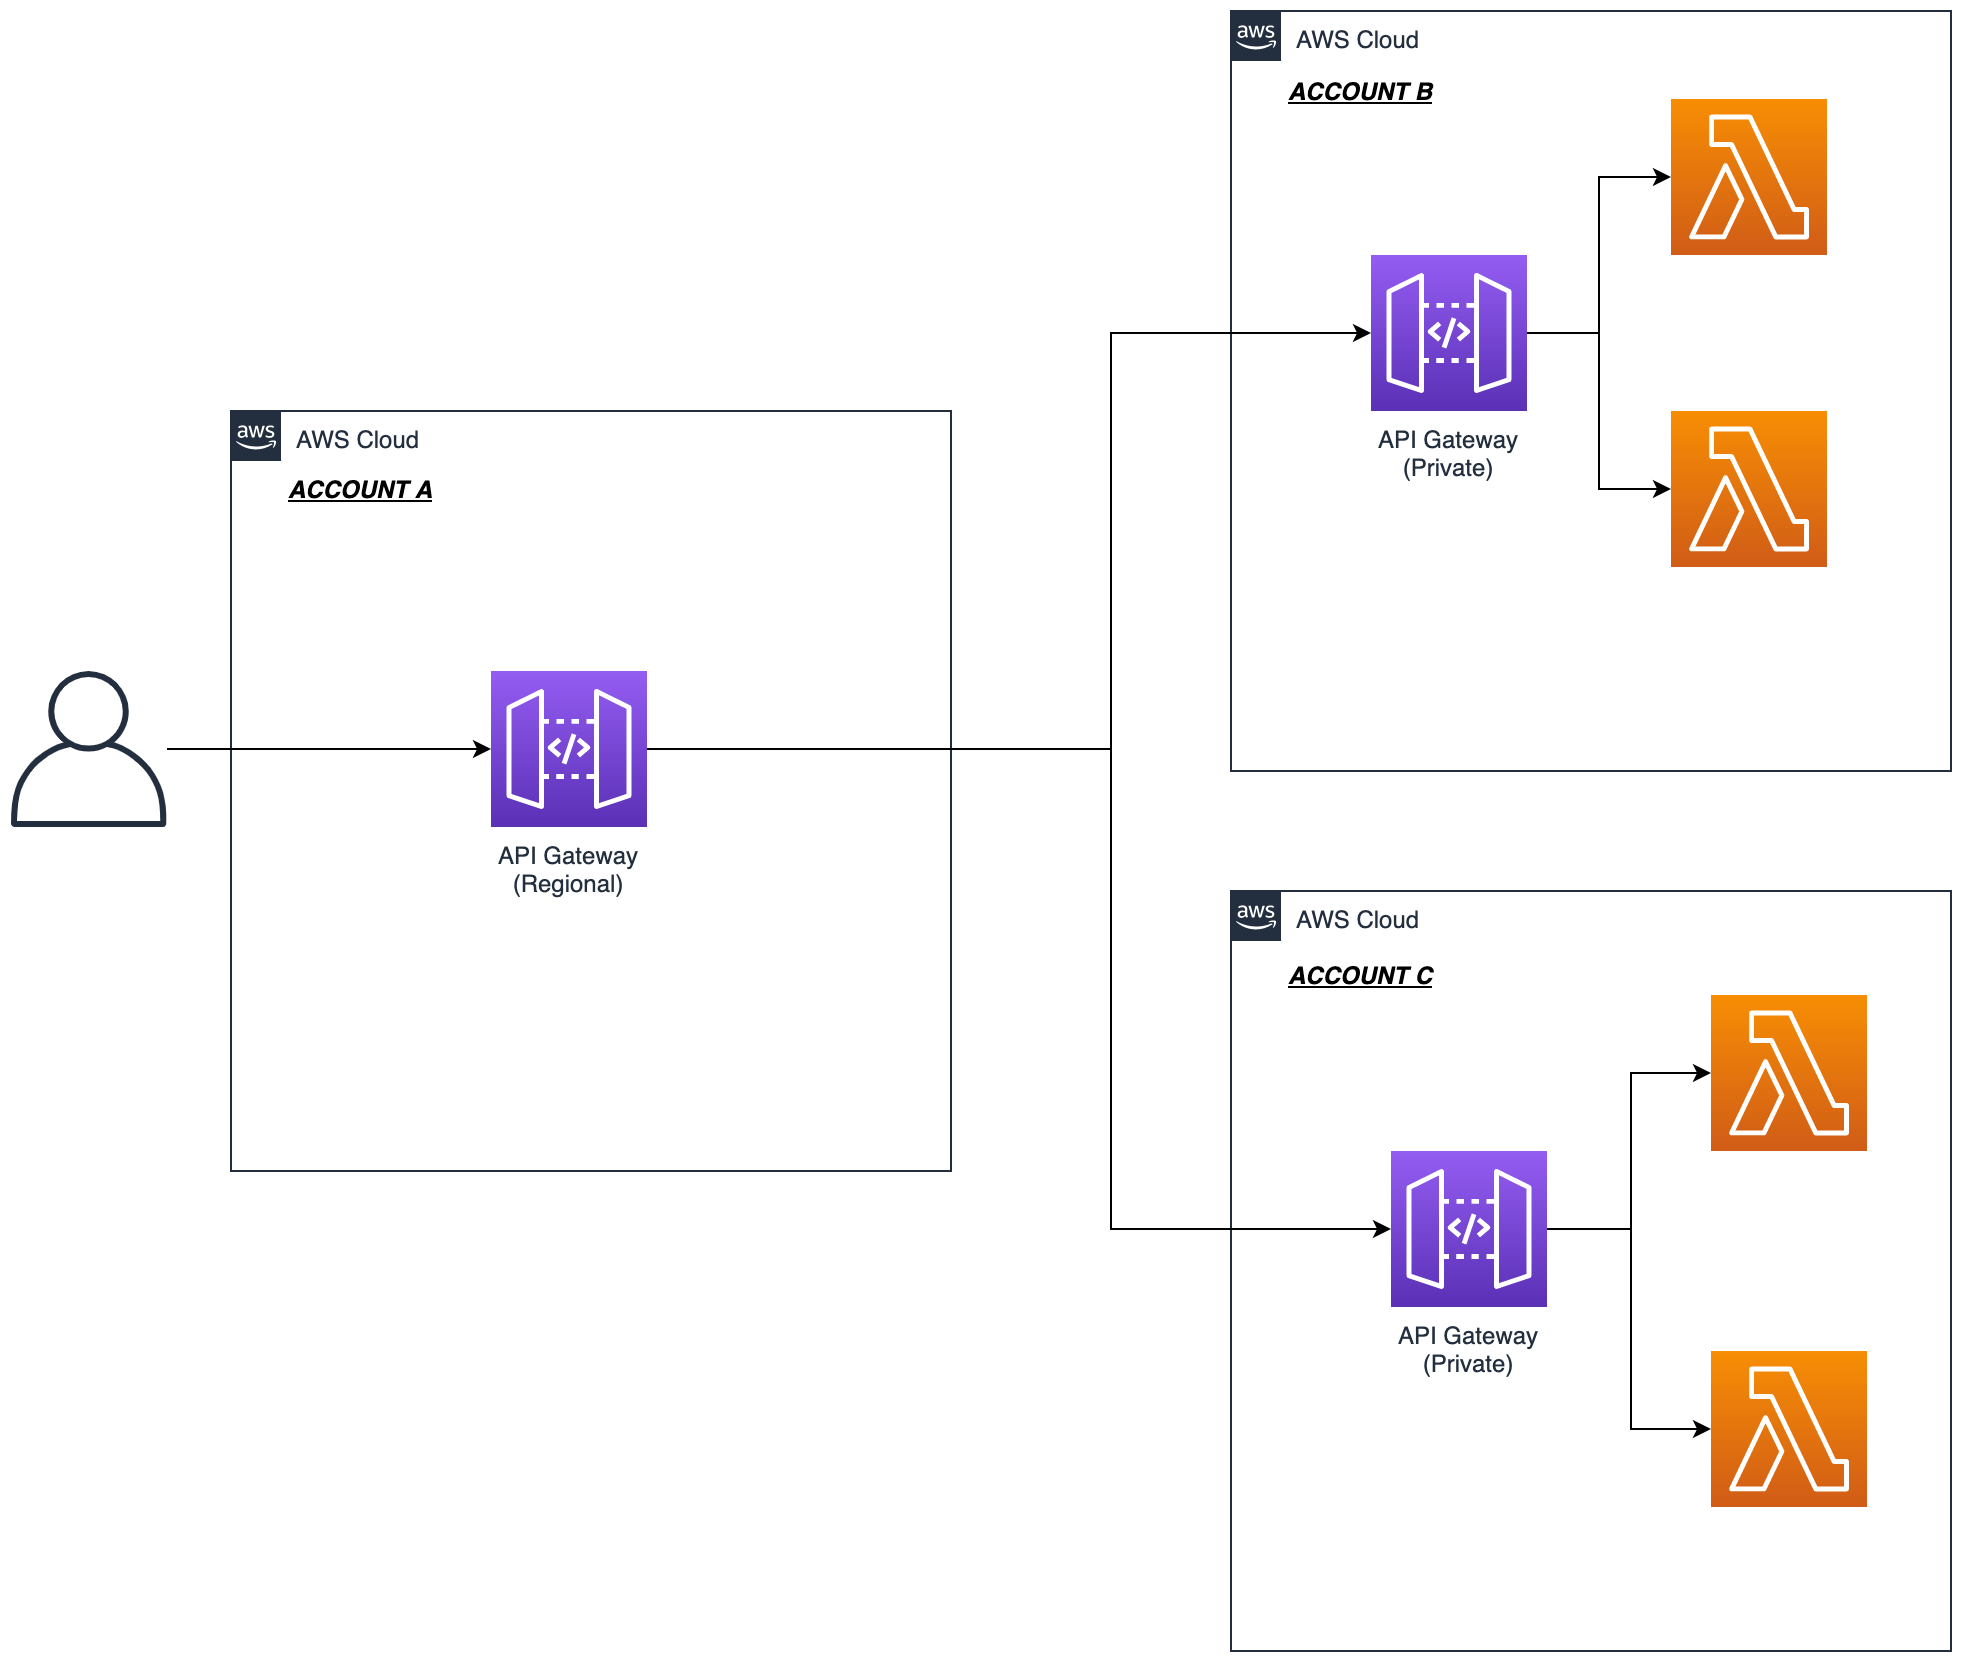
In this article I will walk through the process of setting up the below scenario.
NOTE: this post only focuses on REST API Gateways. I also assume you have some existing experience with API Gateway.
A more detailed look
Below is a more detailed version of what we will be implementing.
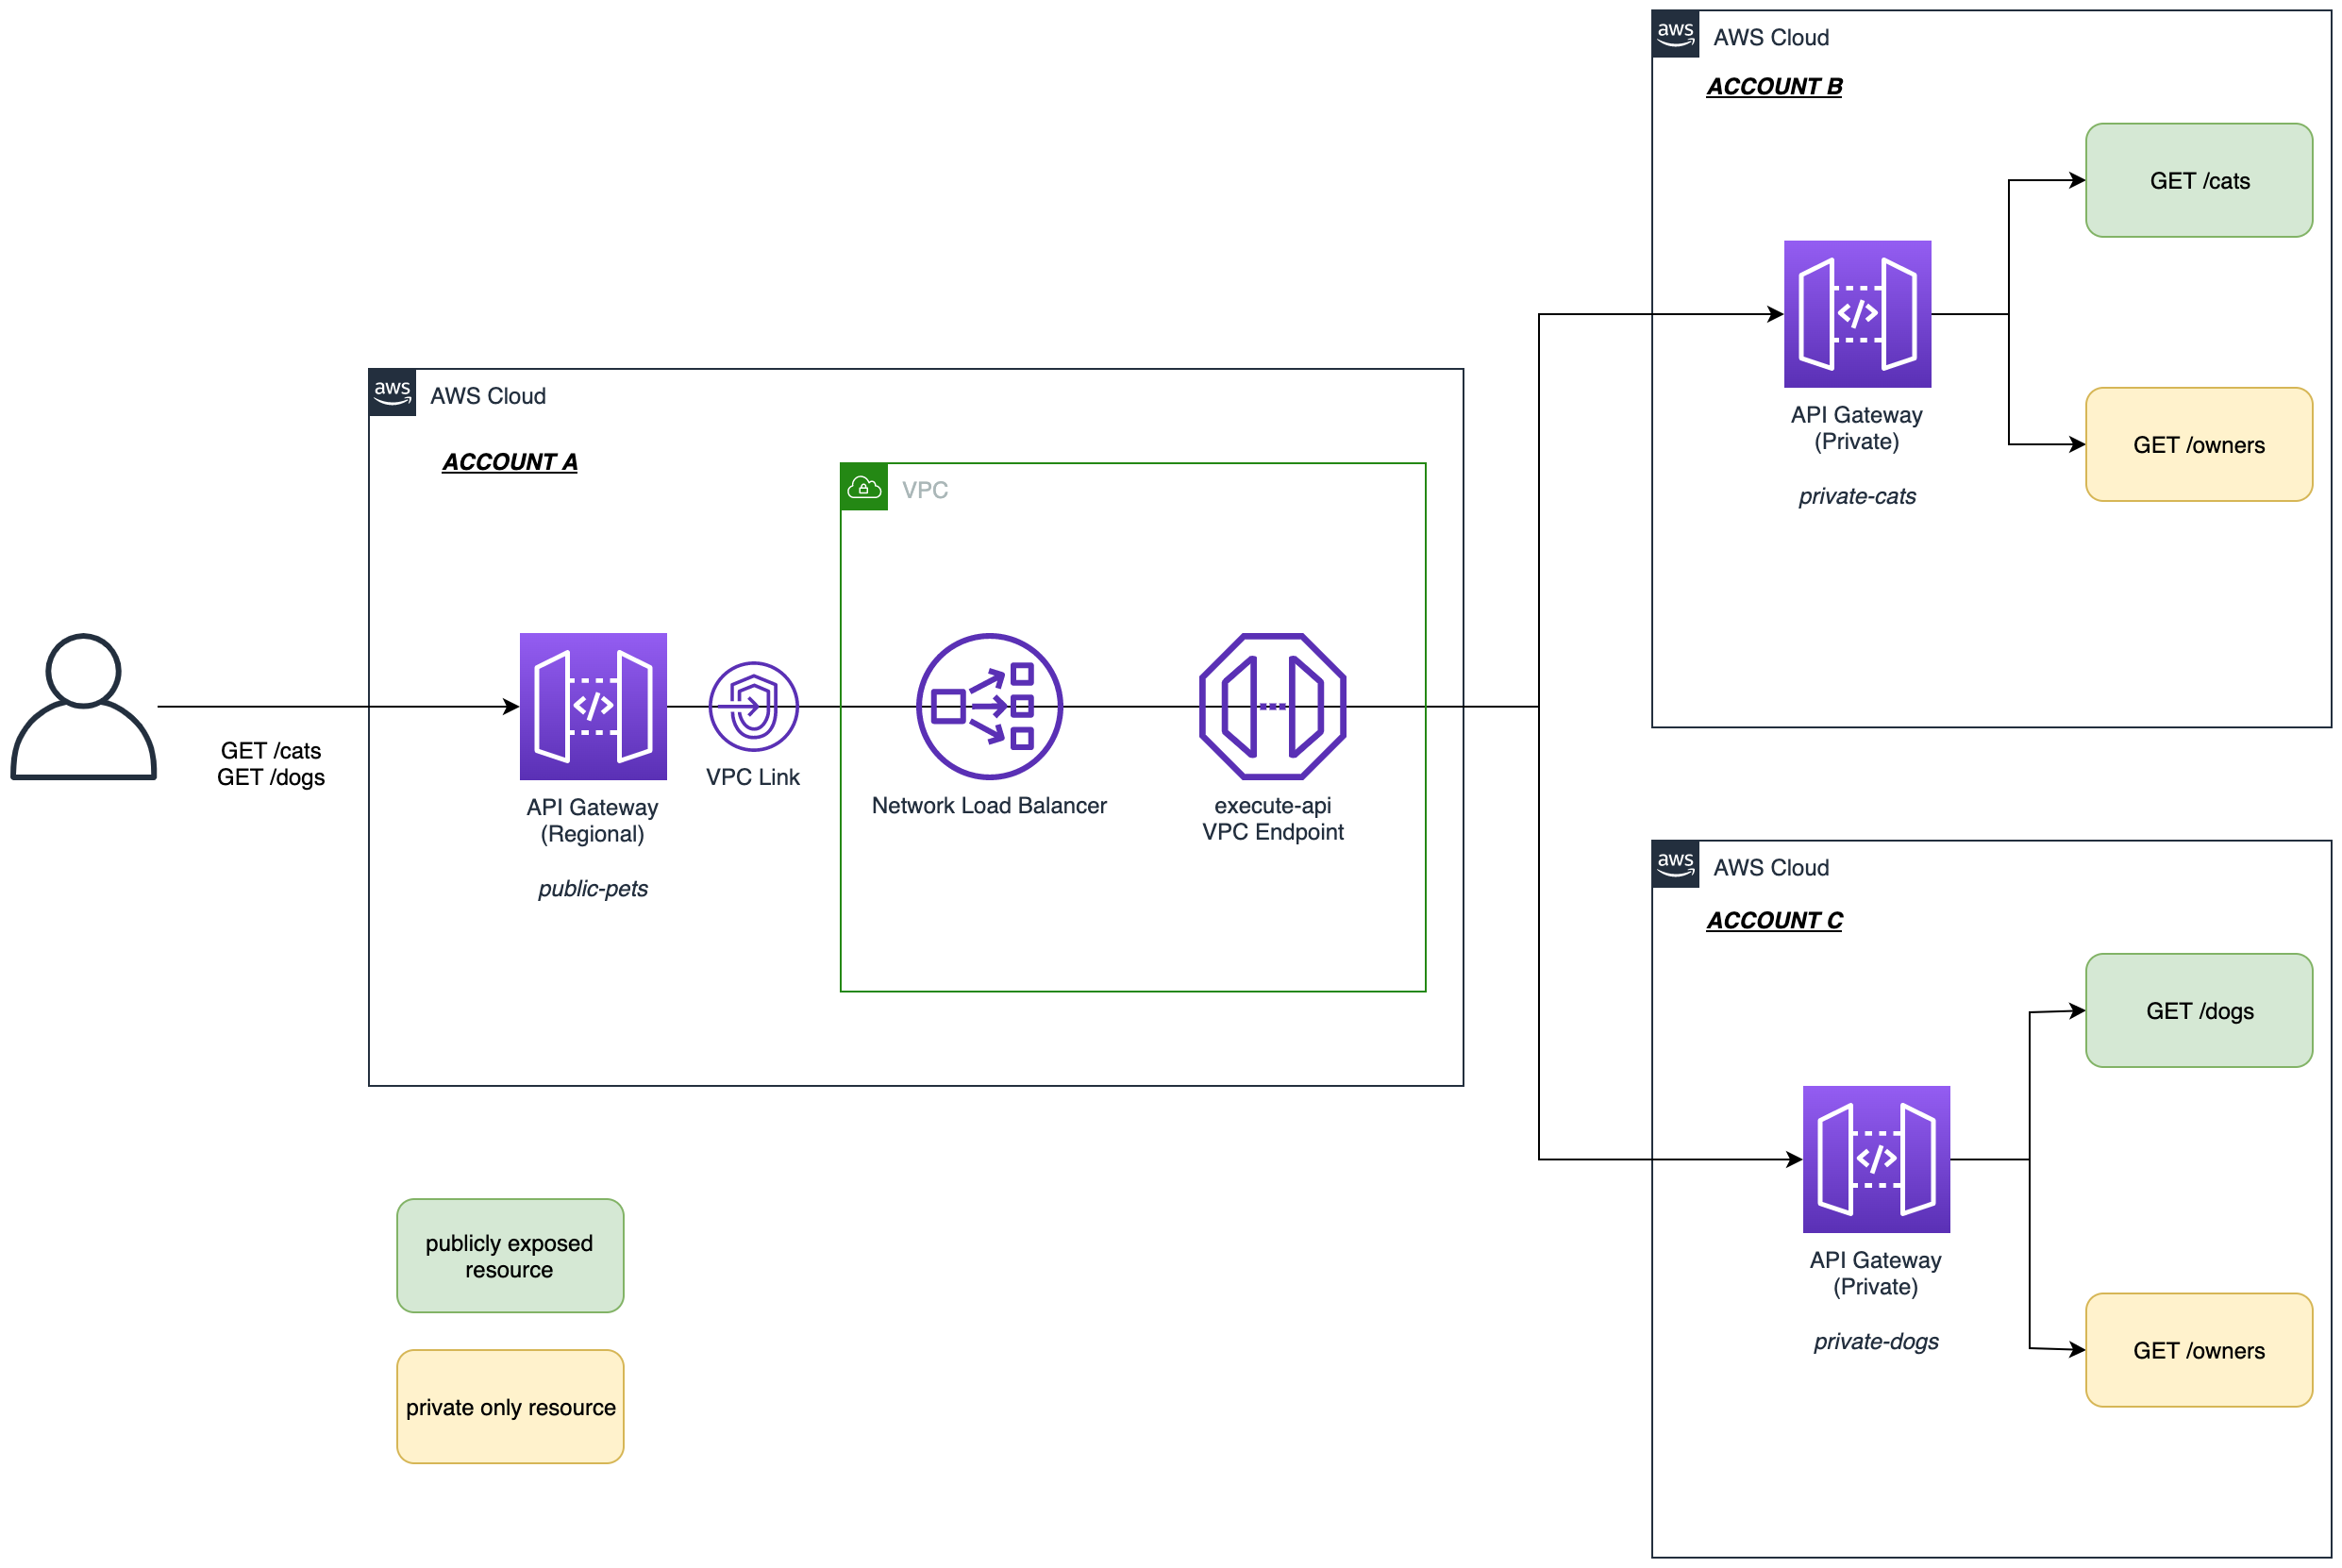
ACCOUNT Awill host a central Regional (Public) API GatewayACCOUNT BandACCOUNT Cwill host the Private API Gateways- Only certain resources will be exposed through the central API Gateway (i.e. those highlighted in green.)
- A VPC Link will be created in
ACCOUNT Ato enable connectivity to the Private APIs in the other accounts. This will be done using a Network Load Balancer and a VPC Endpoint for API Gateway (execute-api).
Step 1: Create VPC and VPC Endpoint in ACCOUNT A
First things first we need to create a VPC and a VPC endpoint in ACCOUNT A. This could be a new VPC dedicated to this API Gateway connection, or an existing one. We just need at least 2 private subnets across multiple availability zones.
Assuming you have the VPC in place already, let’s create the API Gateway (execute-api) VPC Endpoint. This is required in order to access a Private API Gateway. It actually doesn’t have to be in the same account as the API Gateway you are trying to access, which is why this architecture works.
-
Log into
ACCOUNT Aand under the VPC Console select Endpoints > Create endpoint -
Select AWS services as the service category and select
com.amazonaws.<region>.execute-apifrom the Services list. -
Select the VPC you are using and under Additional settings ensure that Enable DNS name is selected. This option will ensure that API Gateway calls over this VPC go via the private endpoint connection and not the public API.
NOTE: To use the private DNS option, the enableDnsSupport and enableDnsHostnames attributes of your VPC must be set to true.
-
Select the private subnets you are using, ensuring you use at least 2 AZs.
-
Select an appropriate Security Group. You will need at least an inbound rule that allows HTTPS port 443 from the VPC CIDR range.
-
Leave the Policy as Full access and click Create endpoint. In production you may want to restrict this further.
Take a note of the VPC Endpoint ID as you will need this for the next section. You can move on whilst this is creating in the background.
Step 2: Create the Private API Gateways in ACCOUNT B and ACCOUNT C
Now we need to create ACCOUNT B and ACCOUNT C Private API Gateways. For simplicity we will setup static mock responses from our APIs, but this could of course be any integration such as a Lambda function.
- Log into AWS
ACCOUNT B - Create a new API Gateway Private REST API named
private-cats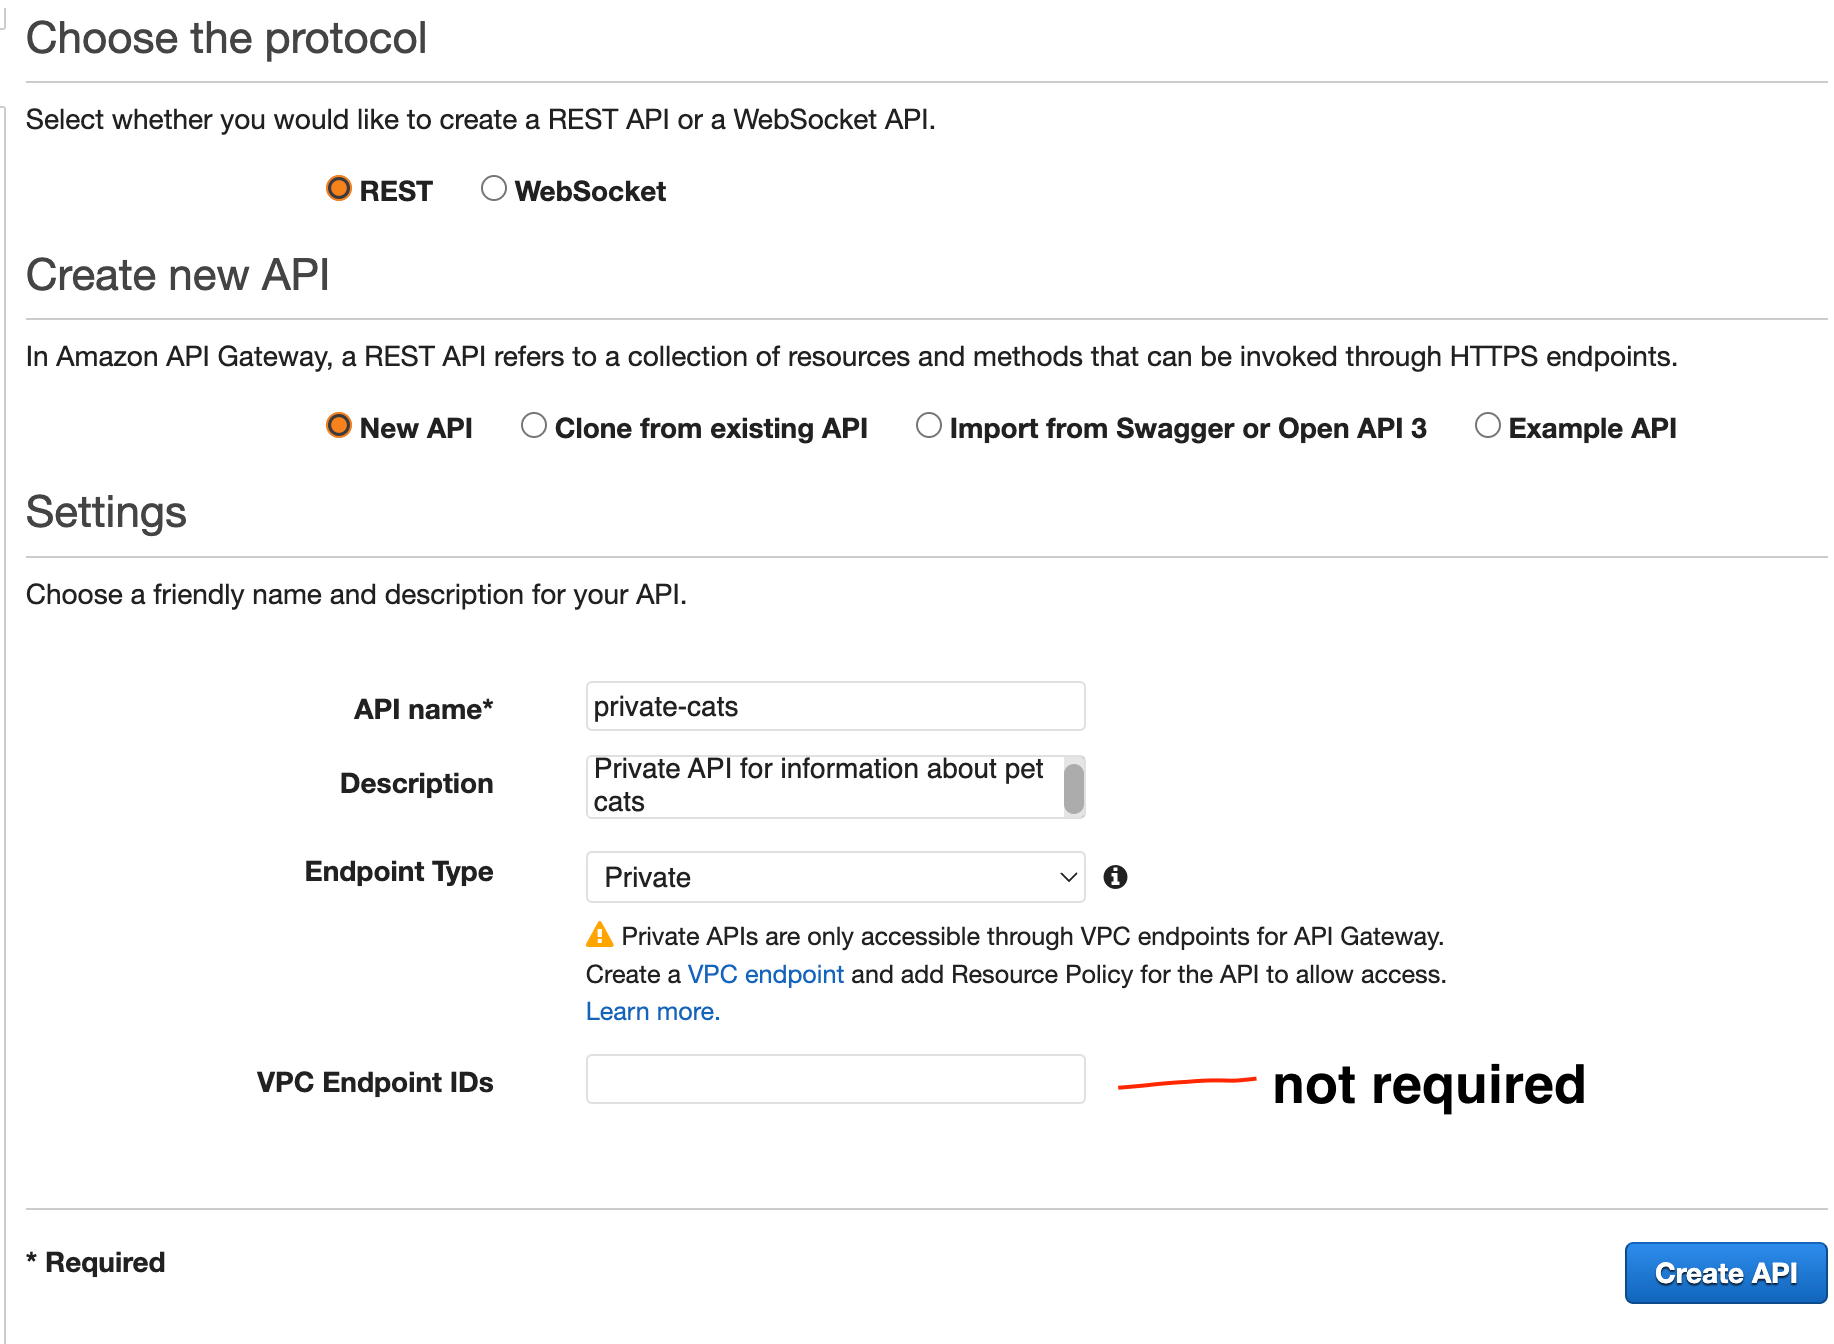
- Create a new resource named
catsand create aGETmethod with aMockintegration.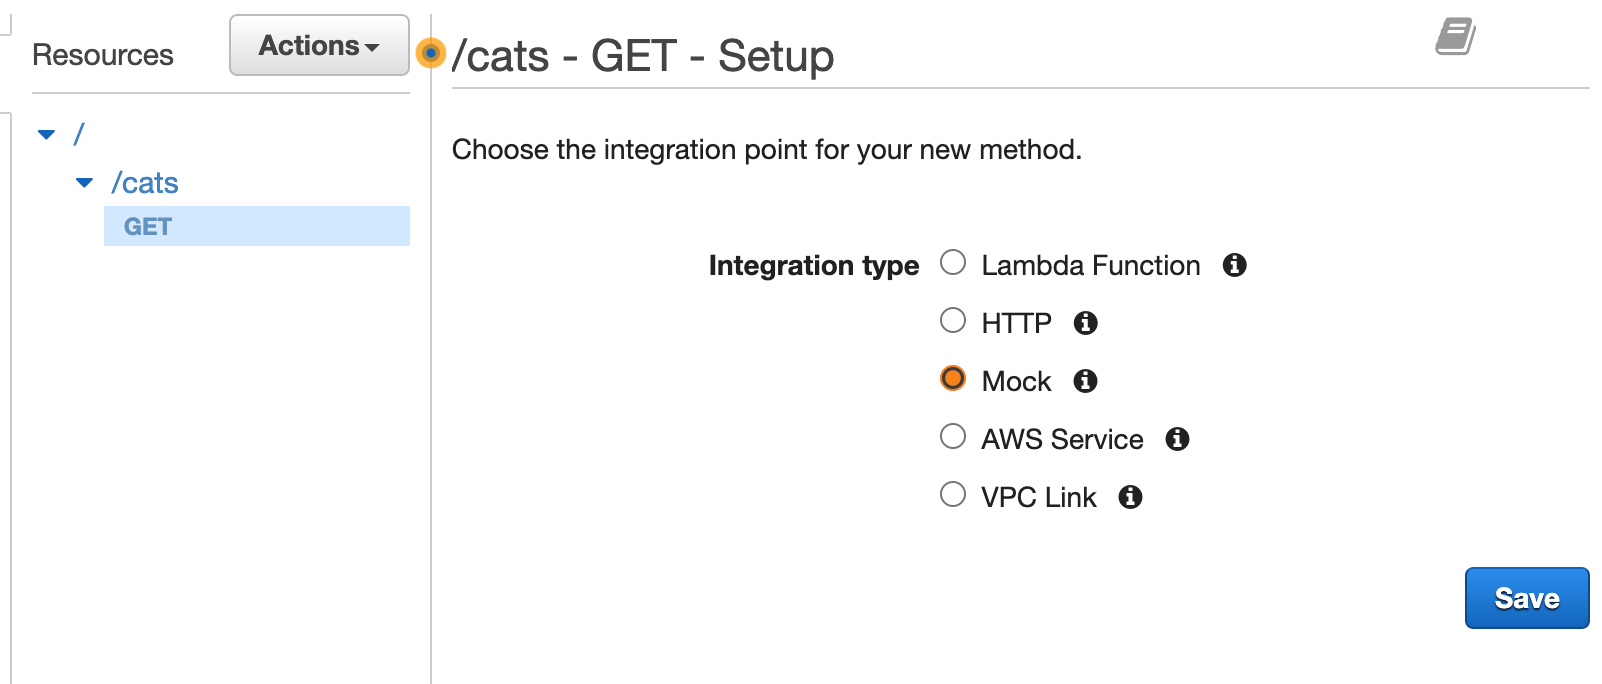
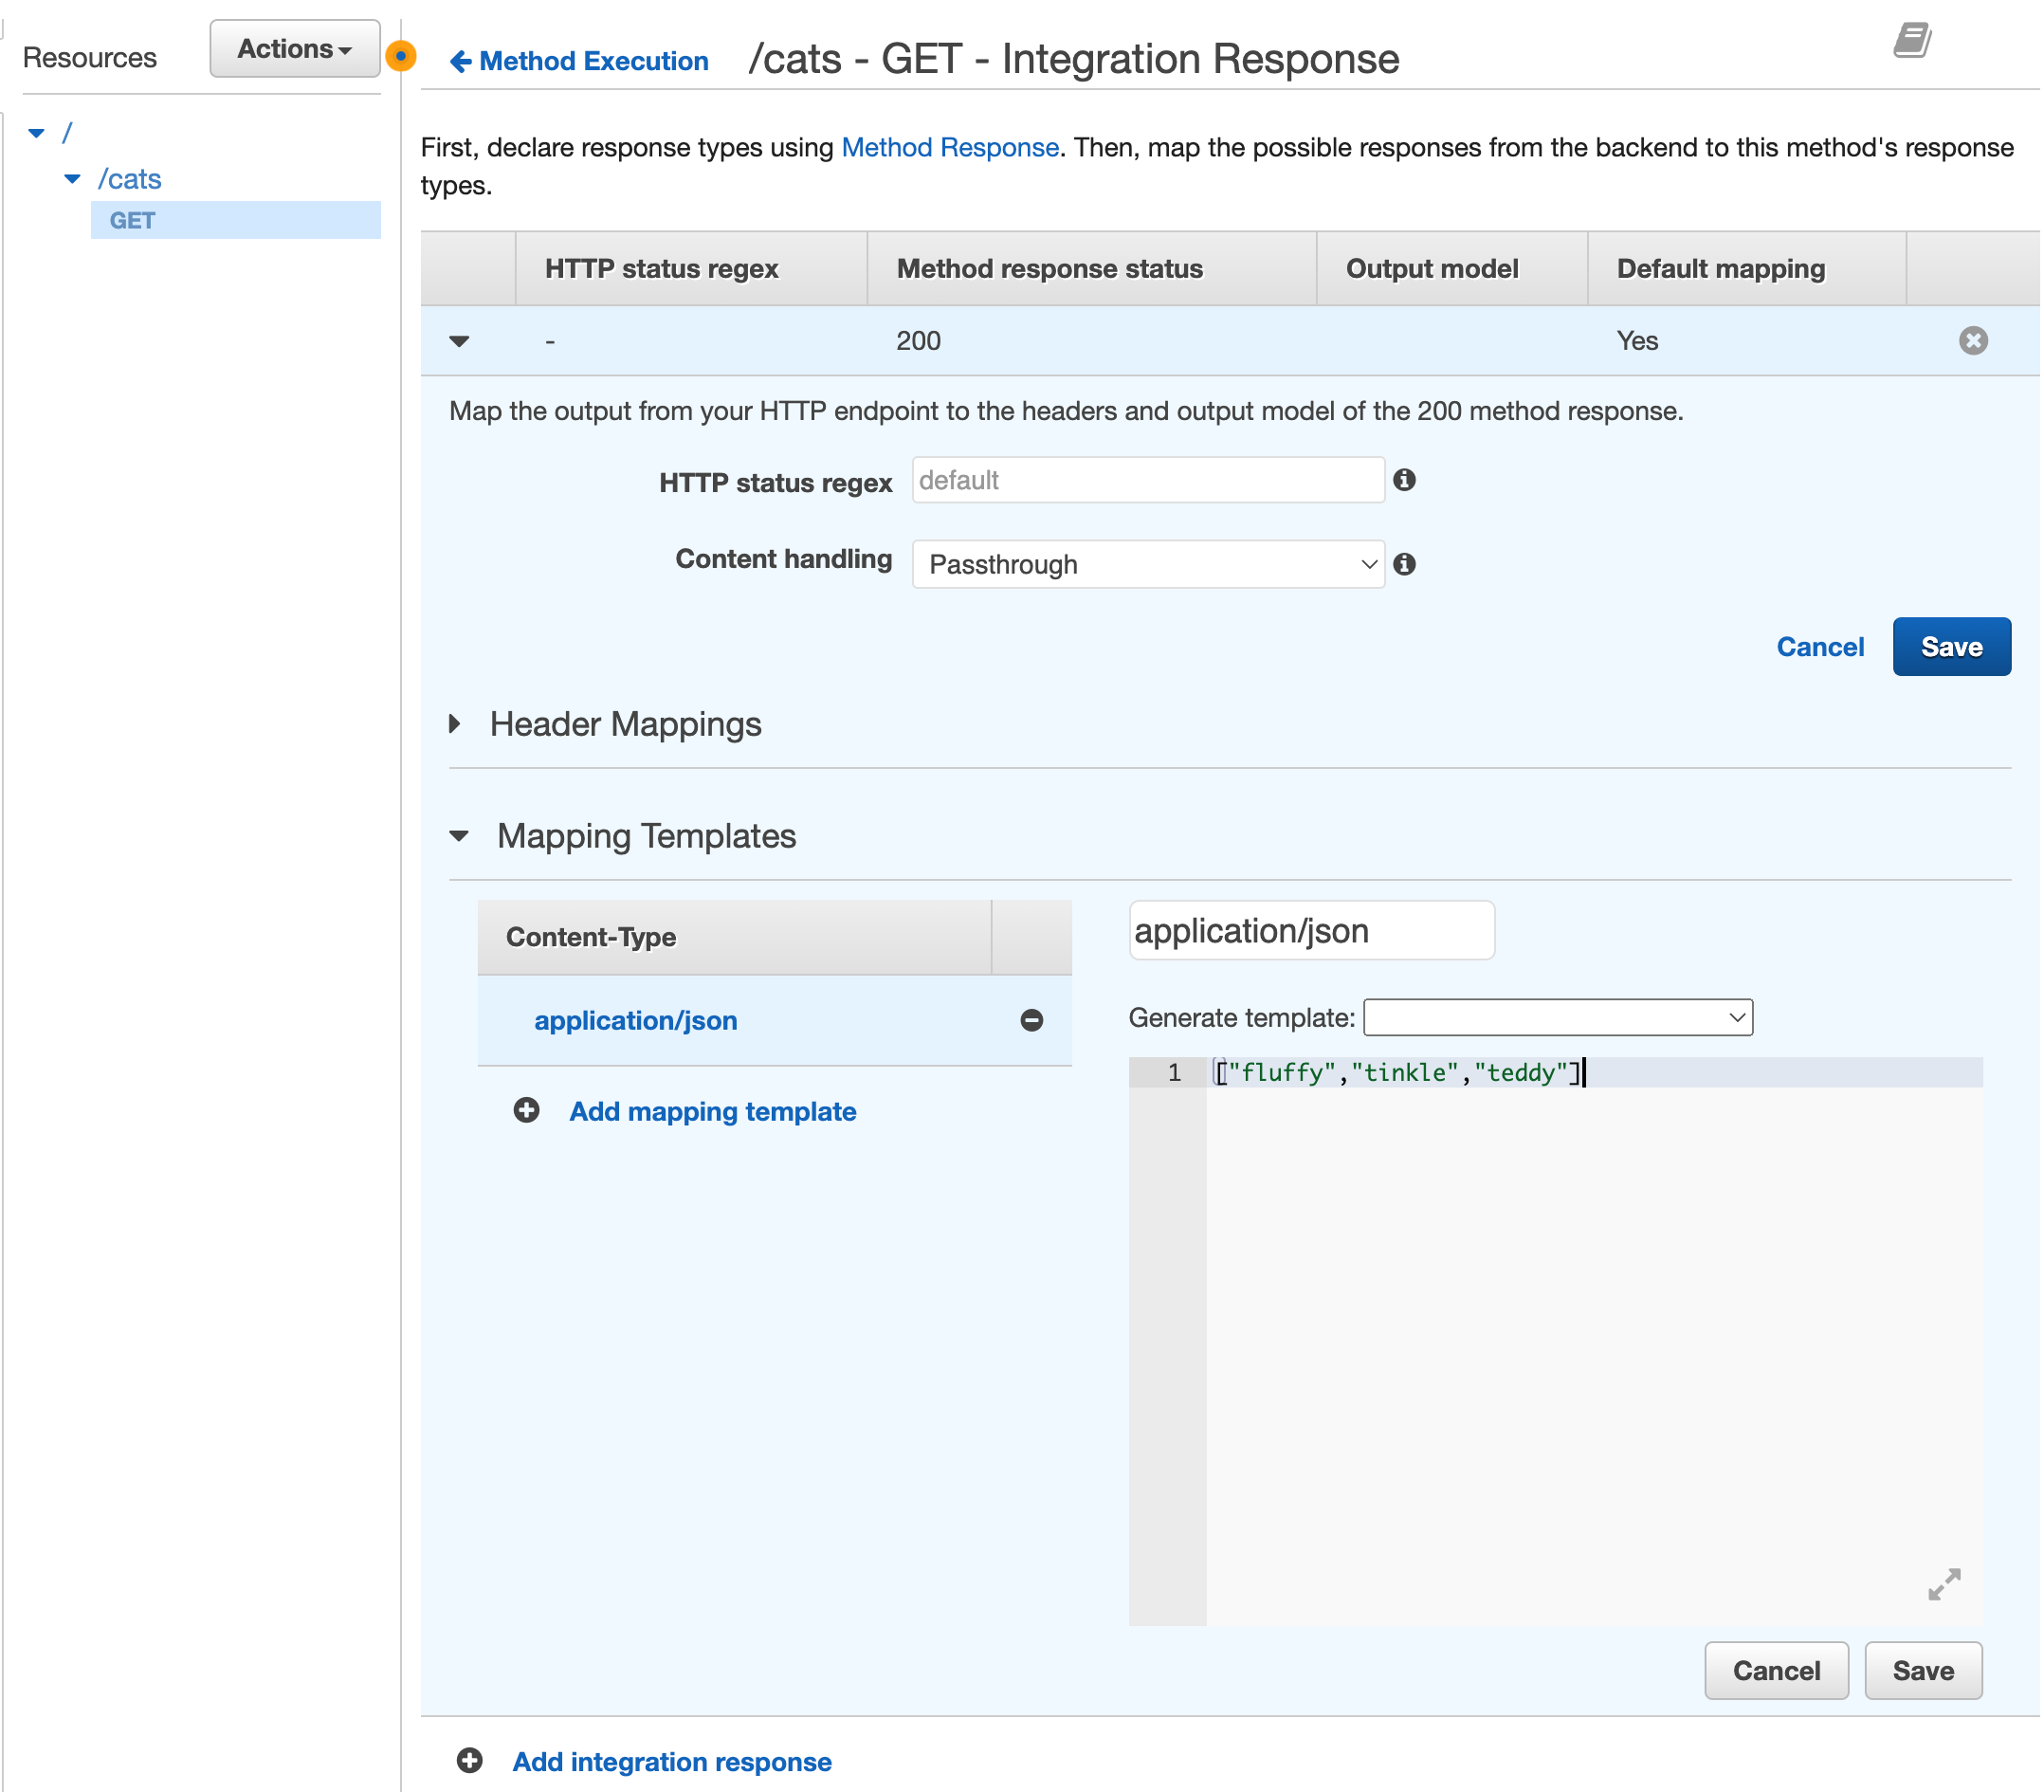
- Under
Integration responsecreate s new mapping template with the followingapplication/jsoncontent:
["fluffy","tinkle","teddy"]
- Create another resource named
/ownerswith aGETmock method using the below data:
["bob","susan","connie"]
- Under resource policy for the
private-catsapi create a policy to restrict access to the API only fromACCOUNT AVPC Endpoint. Use the policy before and substitute the VPC Endpoint if fromACCOUNT A. This policy is really important as it is the only thing stopping other AWS accounts with the execute-api VPC Endpoint from connecting to your private API!
{
    "Version": "2012-10-17",
    "Statement": [
        {
            "Effect": "Allow",
            "Principal": "*",
            "Action": "execute-api:Invoke",
            "Resource": [
                "execute-api:/*"
            ]
        },
        {
            "Effect": "Deny",
            "Principal": "*",
            "Action": "execute-api:Invoke",
            "Resource": [
                "execute-api:/*"
            ],
            "Condition" : {
                "StringNotEquals": {
                    "aws:SourceVpce": "vpce-1a2b3c4d"
                }
            }
        }
    ]
}
- Save this and deploy the api to a new stage named
prd - Repeat the above steps for
ACCOUNT C, creating theprivate-dogsAPI. You can make up your own mock data for dogs and owners ;).
Step 3: Create the VPC Link in ACCOUNT A
Now we have the private APIs in place we can go back to ACCOUNT A and create the VPC Link. This will involve creating a Network Load Balancer (NLB) that points to the VPC Endpoint IP addresses created in Step 1.
- Log into
ACCOUNT Aand in the EC2 Console go Target Groups to create a new target for the NLB. - Use the IP Addresses target type, selecting TCP 443 and your allocated VPC. For the health check use HTTPS and the health check path of /ping. This is the API Gateway service health check and will ensure the API Gateway service is online and healthy.
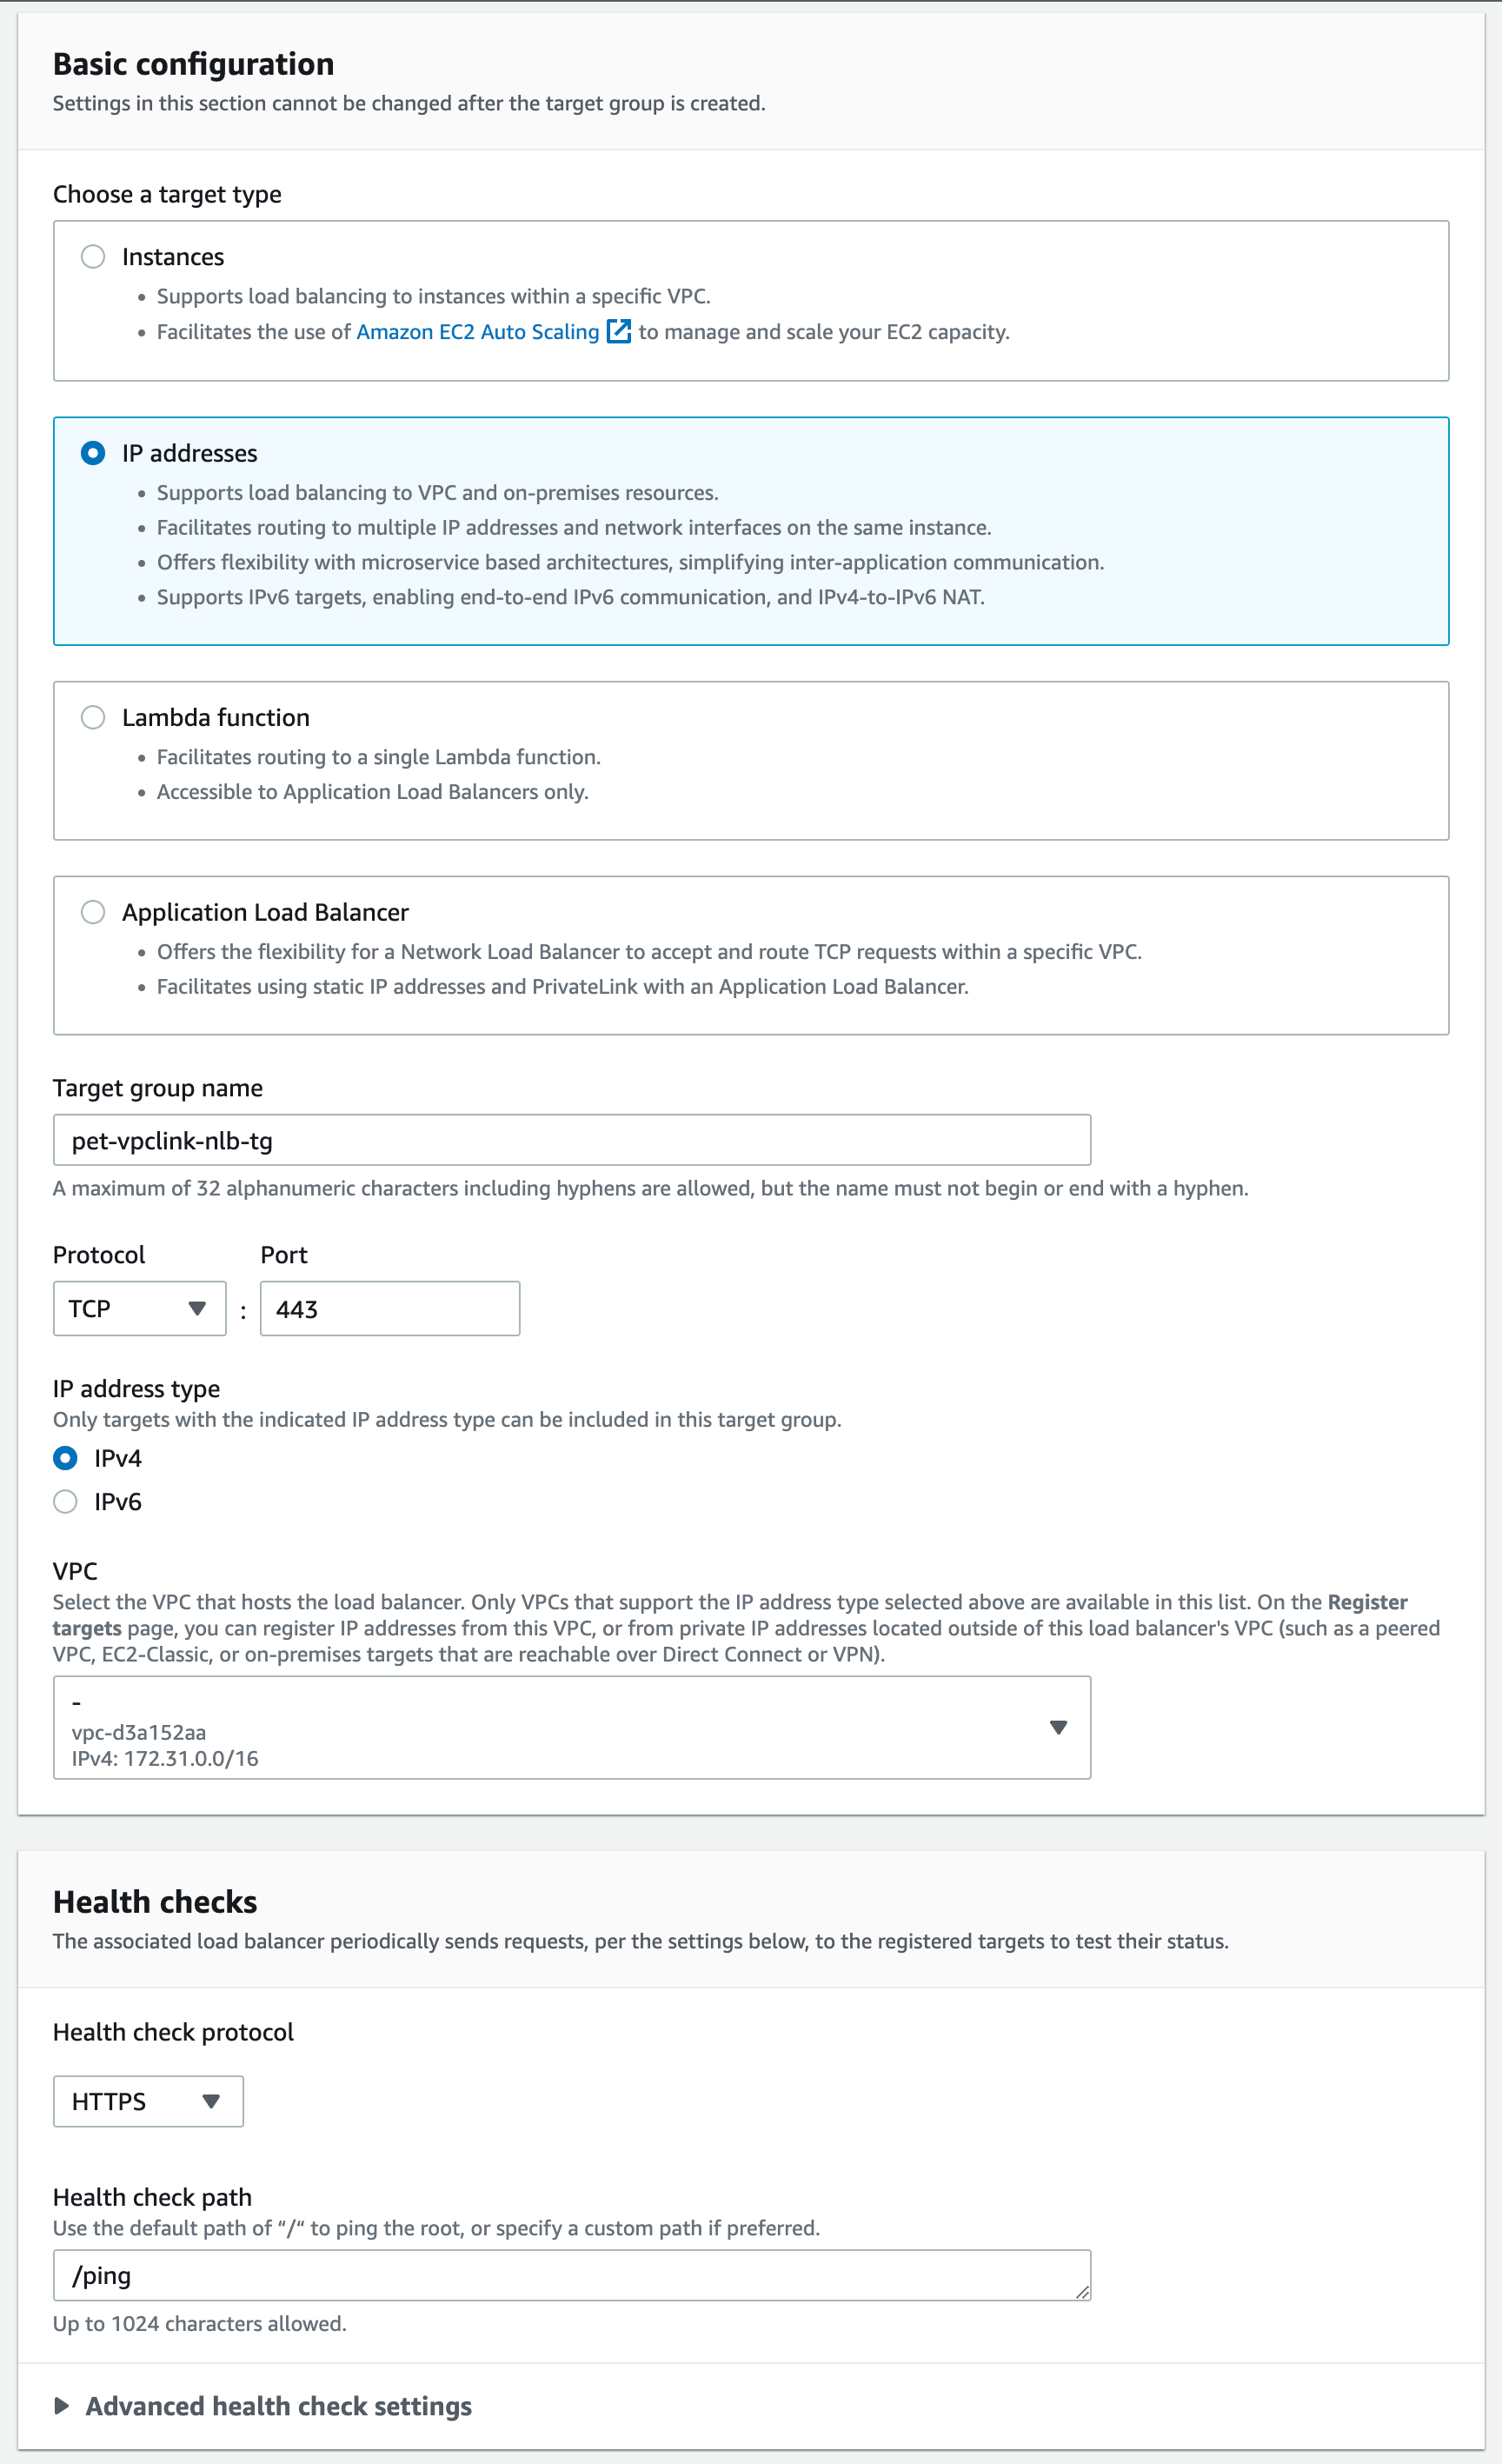
- On the next page add the IP addresses allocated from the
execute-apiVPC Endpoint which you created in Step 1. These should be private IP addresses within your VPC. You can find these IP addresses in the VPC > Endpoints console. There will be one for each availability zone. - Create the Target Group.
Now we have the Target Group in place we can go ahead and create the Network Load Balancer.
-
Under the EC2 > Load balancers Console create a new load balancer.
-
Select Network Load Balancer.
-
Create an Internal load balancer using you allocated VPC and subnets. For the listener select TCP port 443 and select the Target Group created in the previous step.
Wait for the NLB to become active before moving onto the next step.
Once the NLB is active we need to use the NLB to create the VPC Link in API Gateway.
- Go to the API Gateway Console and select VPC Links from the left hand menu.
- Create a VPC Link for REST APIs selecting the NLB created in the previous step.
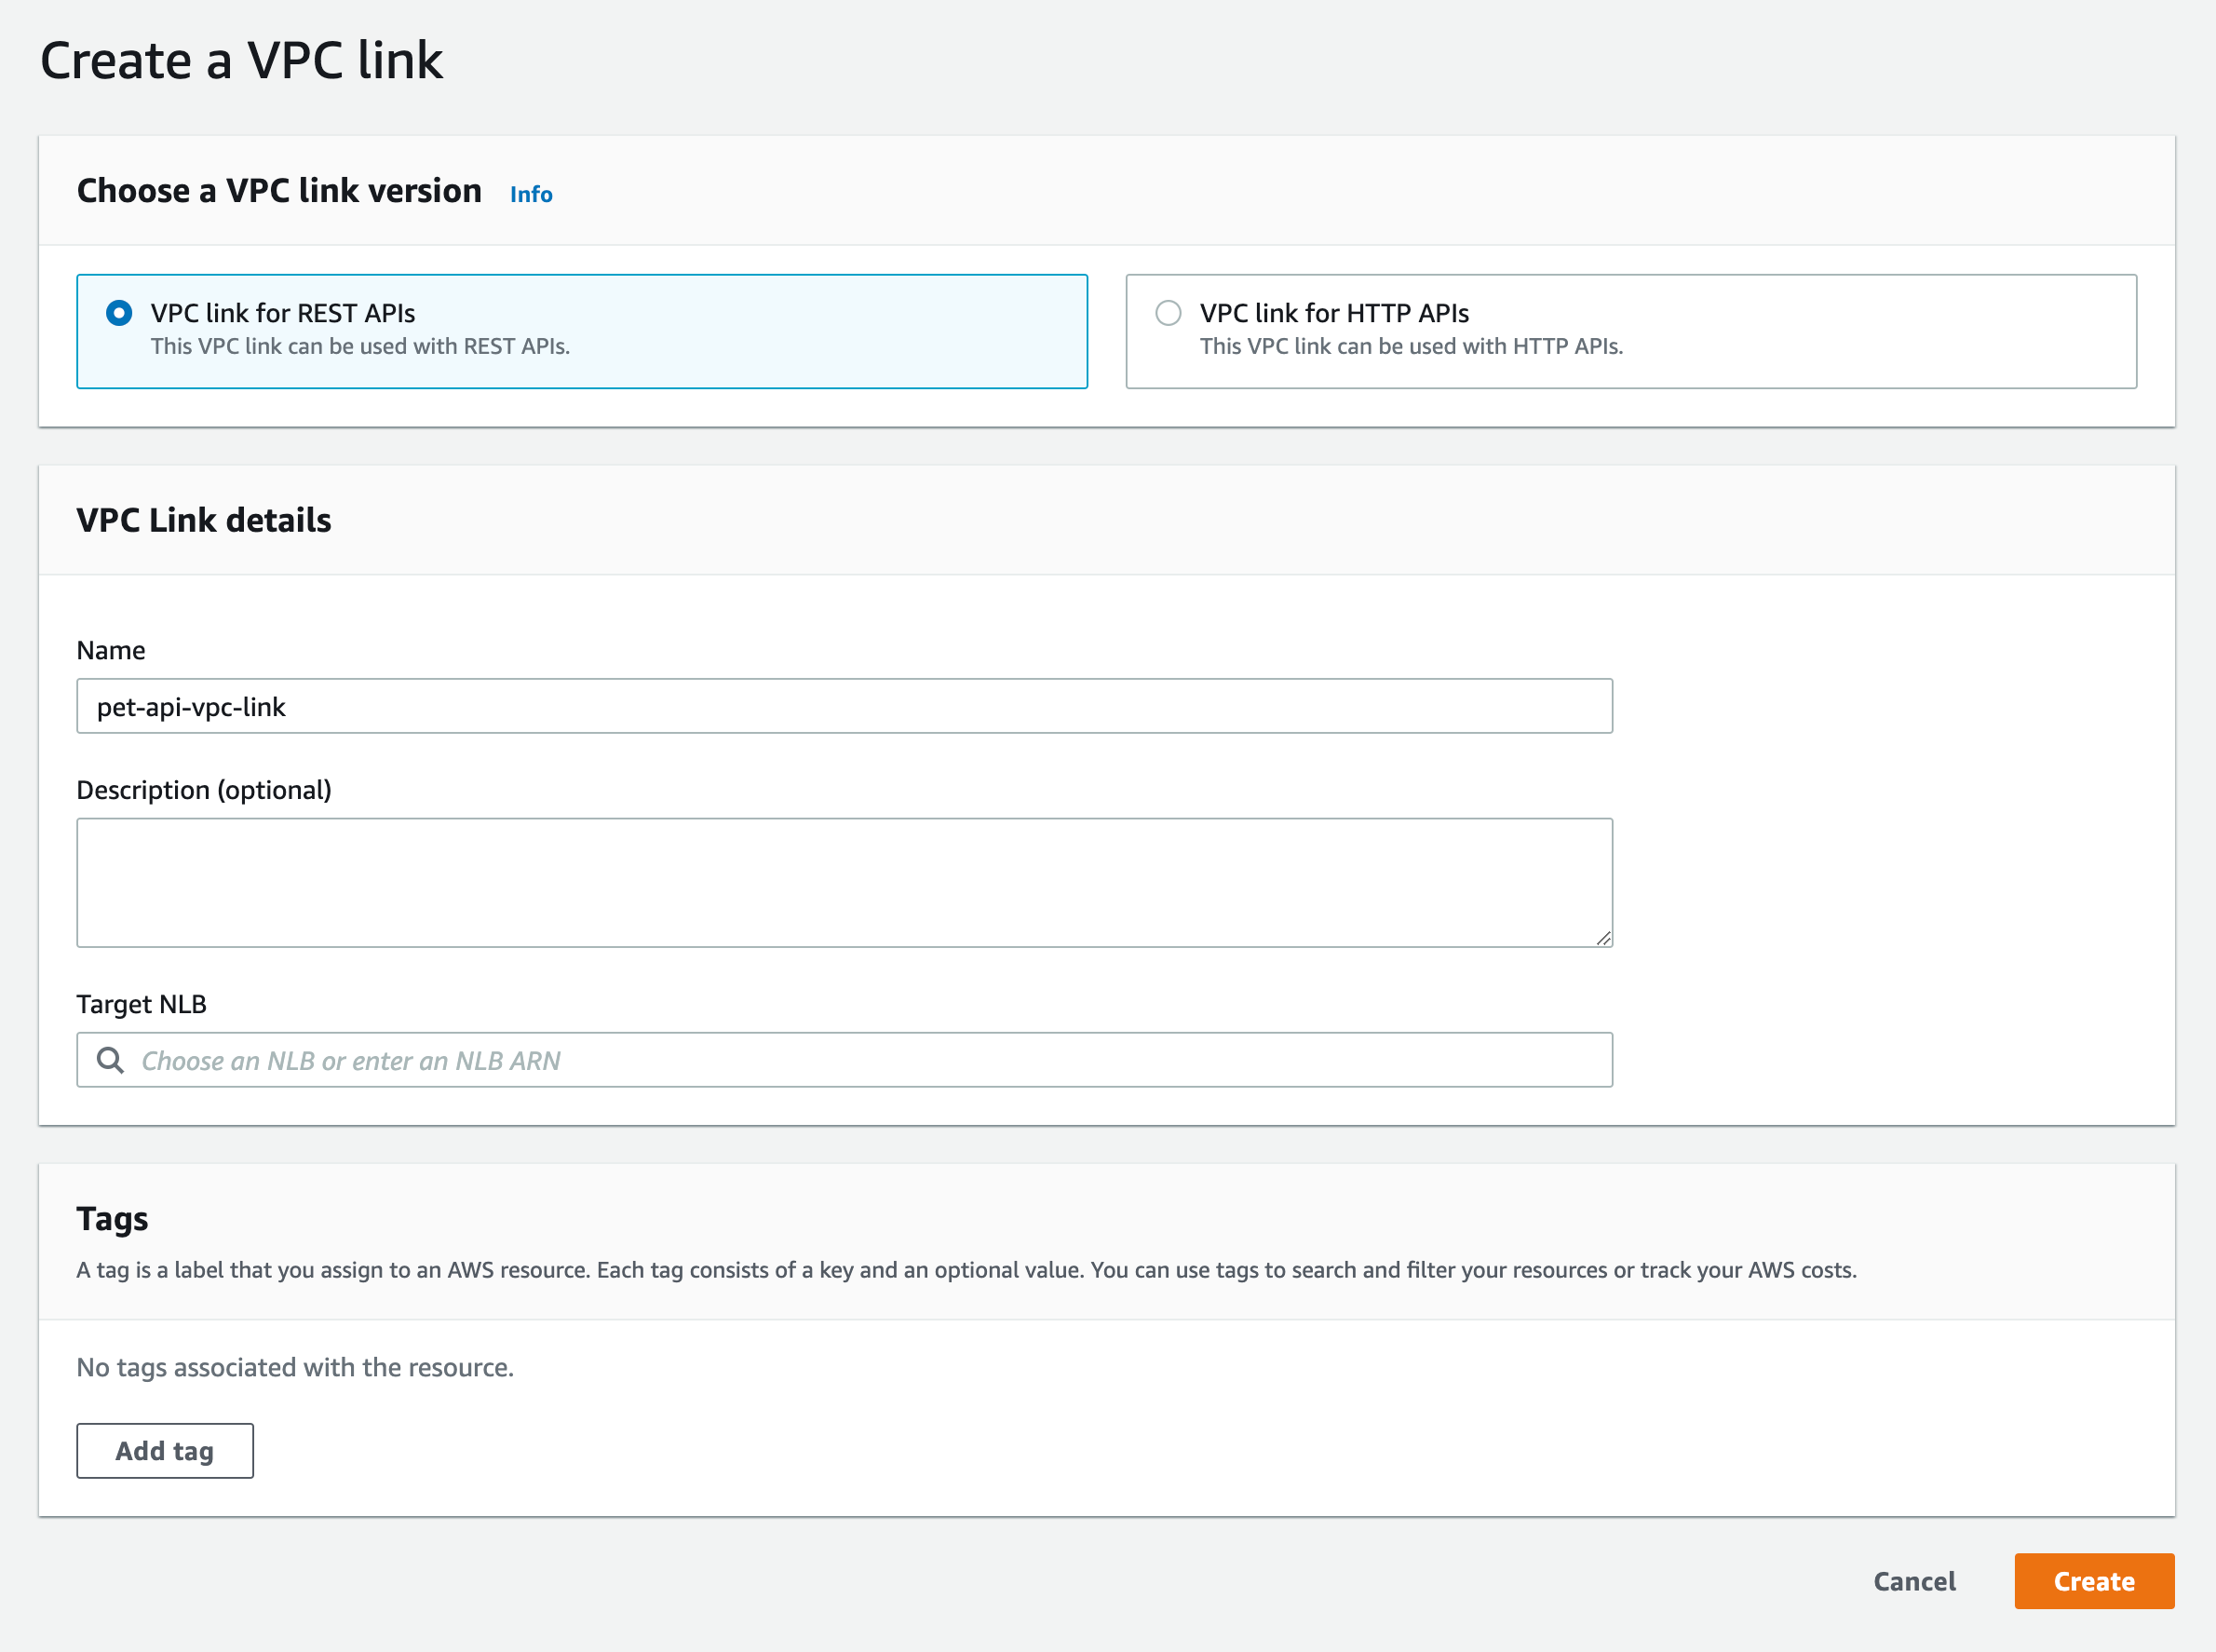
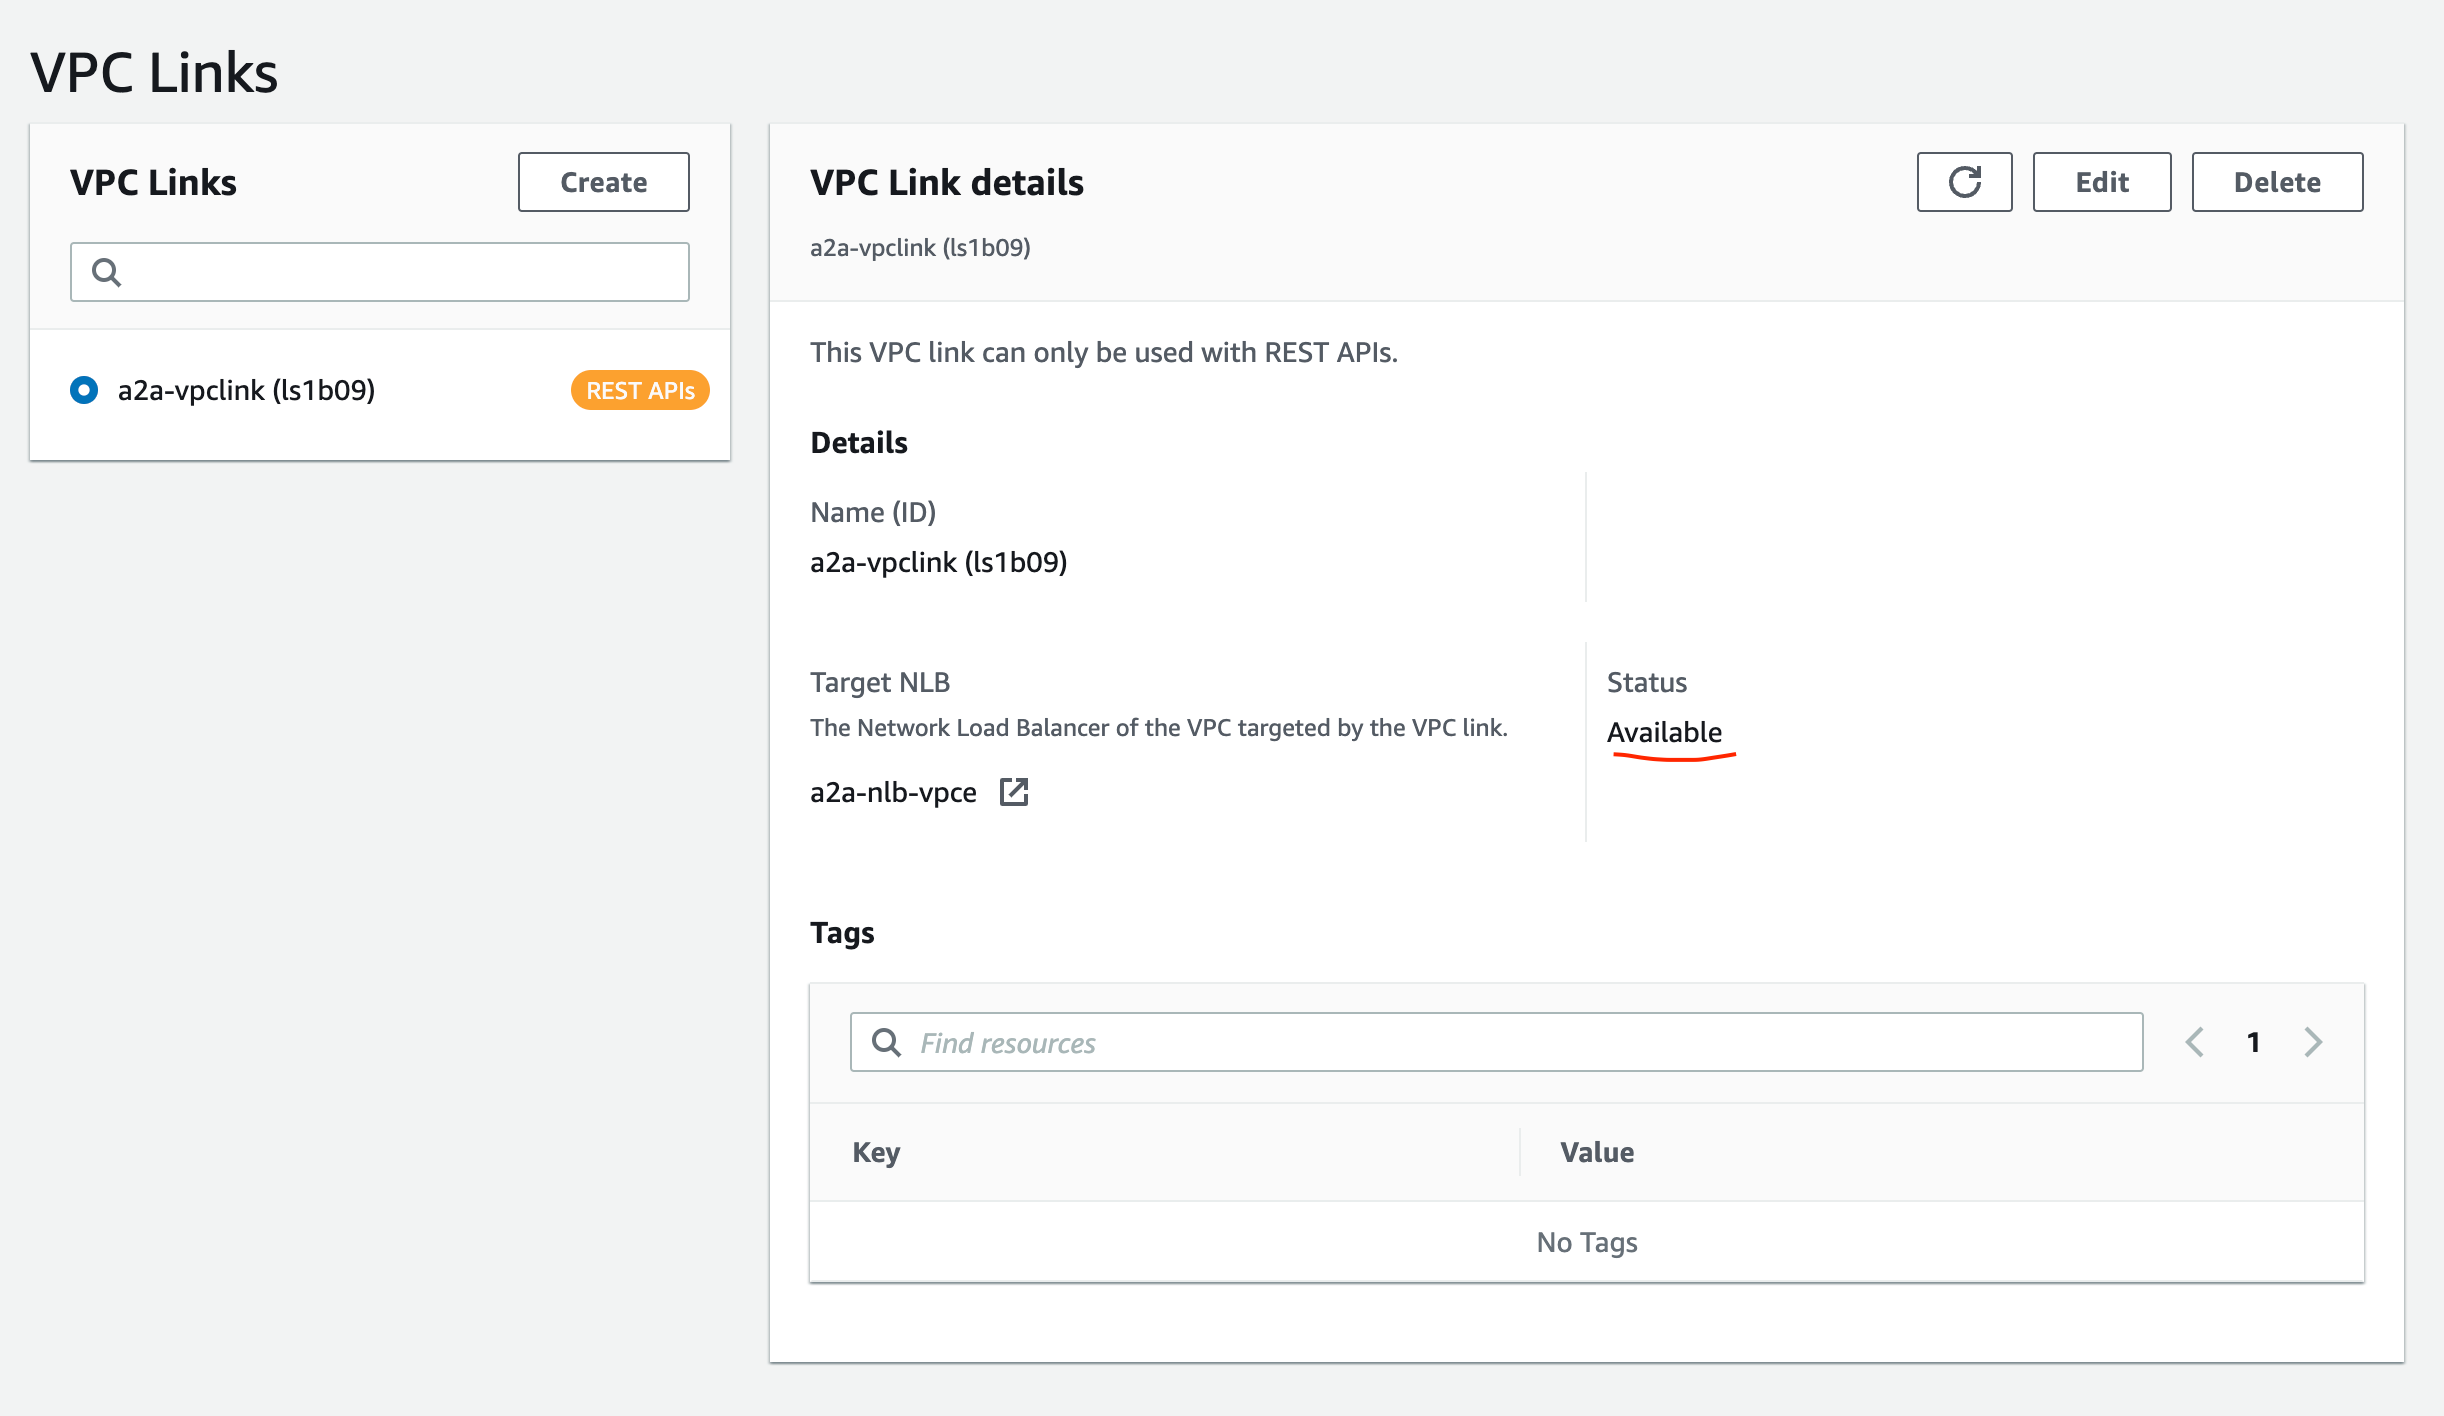
Wait for the VPC Link to become available before moving to the next step.
Step 4: Create the public-pets API in ACCOUNT A
We now have everything we need in place to create our front door API!
-
Log into
ACCOUNT Aand go to the API Gateway Console. -
Create a new Regional REST API.
-
Create a new resource named
/catswith a newGETmethod. -
Select VPC Link as the integration type and select your created VPC Link connection from the dropdown box.
-
For the Endpoint URL use the URL generated from the private-cats API when you published it in
ACCOUNT B. It should look something likehttps://a1b2c3d4.execute-api.eu-west-1.amazonaws.com/prd/cats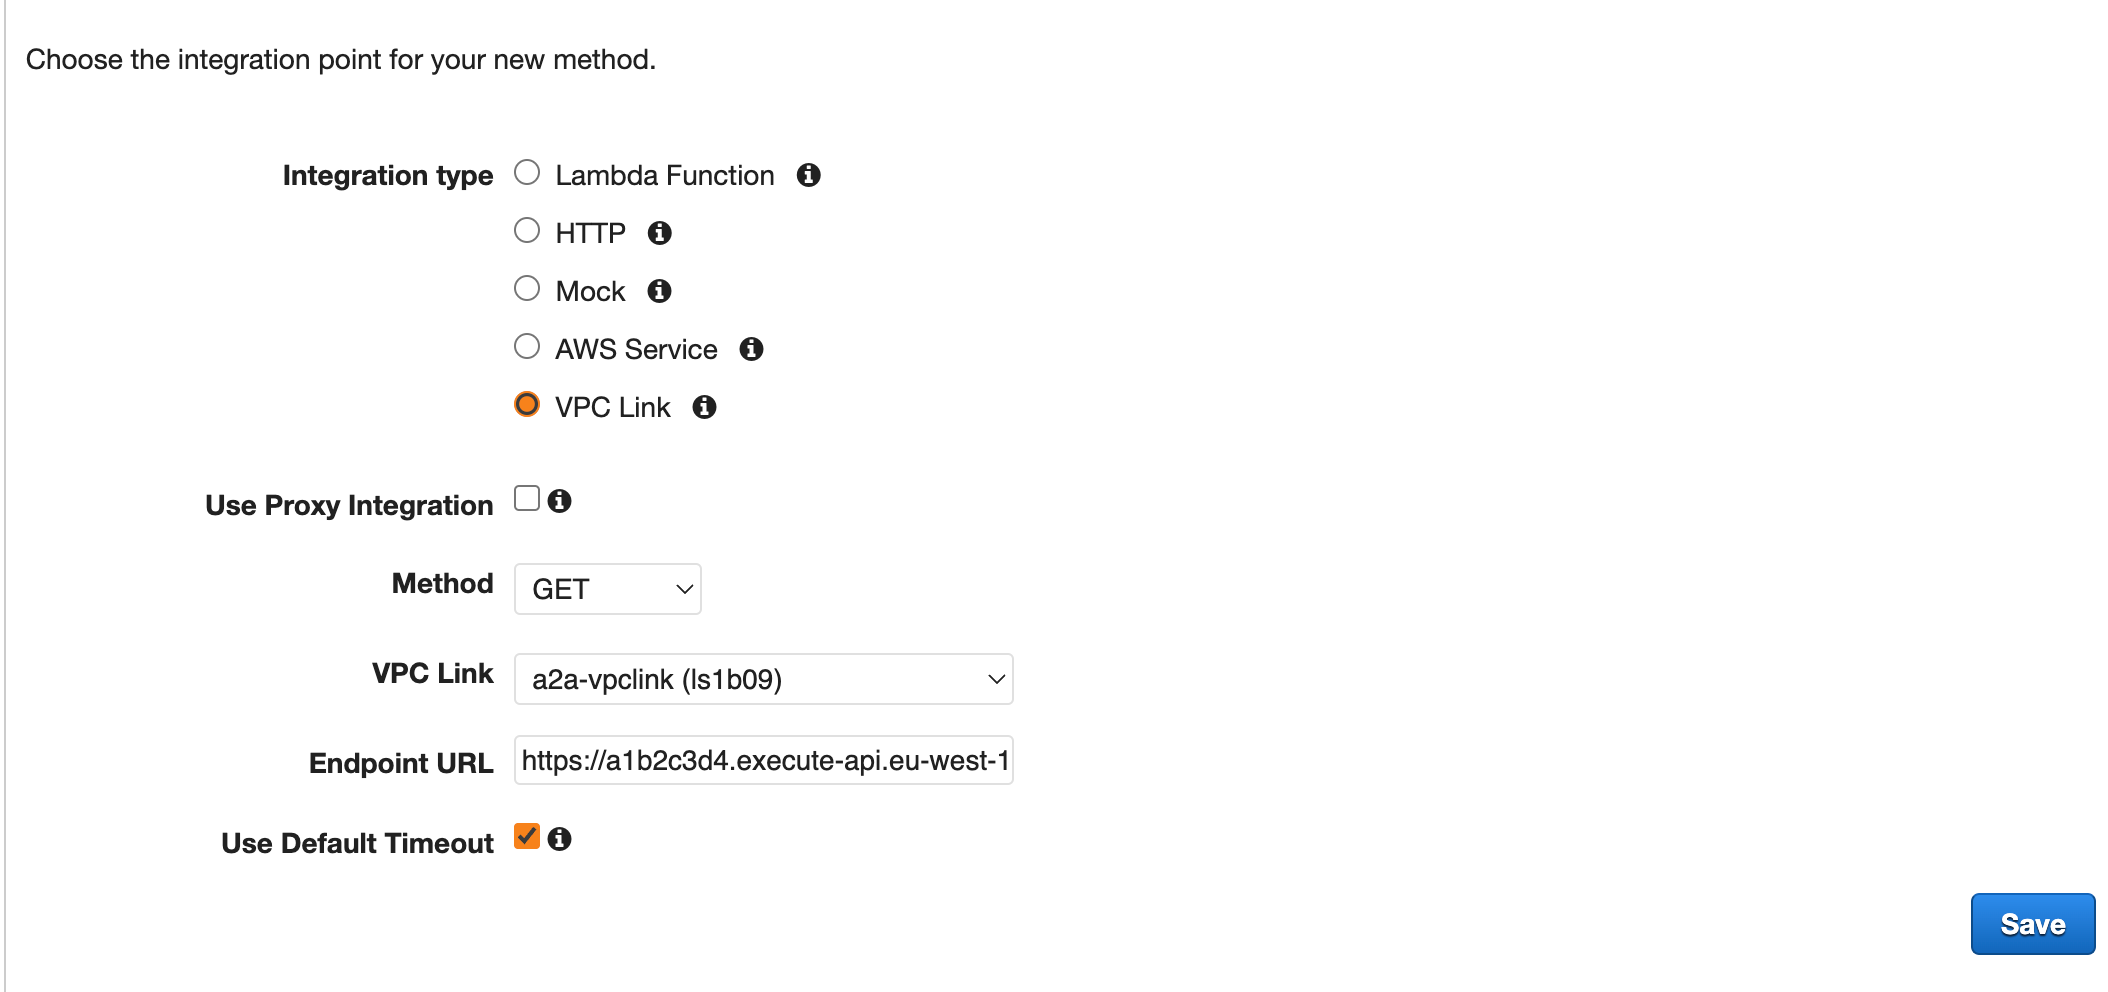
-
Save the method and deploy the API!
-
You should now be able to run a test against the given public API from any machine on the internet. It should return the static response from the private API created earlier.
$ curl https://e5n7h8j9k0.execute-api.eu-west-1.amazonaws.com/prd/cats
["fluffy","tinkle","teddy"]
Congratulations! You have now successfully deployed an API Gateway proxy architecture!