Uploading files to Amazon S3 through API Gateway
Note: there is now an official AWS blog on this topic that I co-authored with my colleague Josh.
In this article I will walk through the different options for uploading files to Amazon S3 via API Gateway. This allows you to create a standard API endpoint for your end users, as well as implement your own authentication mechanisms.
The main issue to contend with is the 10MB payload limit in API Gateway. I will cover a solution for the upload of files larger than 10MB using Amazon S3 pre-signed URLs generated by API Gateway and Lambda.
At the end I will introduce an alternative solution using CloudFront and Lambda@Edge instead of API Gateway.
Using API Gateway as a direct proxy
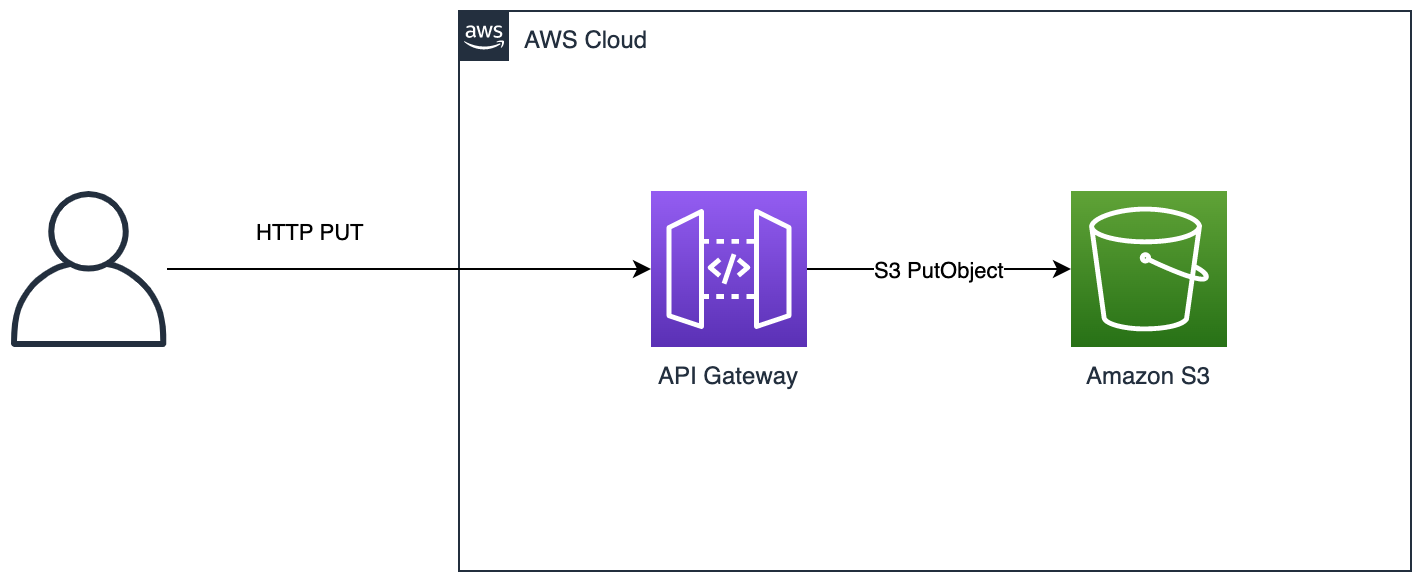
If you know the payload size will always be below the 10 MB limit then the simplest option is to proxy requests to the S3 PUT API. API Gateway service quota limits state that 10 MB is a hard limit that cannot be increased.
-
Create an S3 bucket to be used for the uploads e.g.
my-apigw-uploads -
Create an IAM Role for API Gateway to access the bucket.
- For the Role use case select API Gateway.
- Add a permission policy to the Role to give PutItem to the S3 bucket e.g.
{ "Version": "2012-10-17", "Statement": [ { "Sid": "APIGWPutAllow", "Effect": "Allow", "Action": "s3:PutObject", "Resource": "arn:aws:s3:::my-apigw-uploads/*" } ] }- Copy the ARN of the Role to be used later.
-
Create a new API Gateway REST API and give it a name e.g.
s3-proxy-api.
-
Create a new resource named
upload(or choose your own) and then a child resource underneath namedobjectwith resource path/{object}. Make sure to use brackets as this will be a path parameter used later.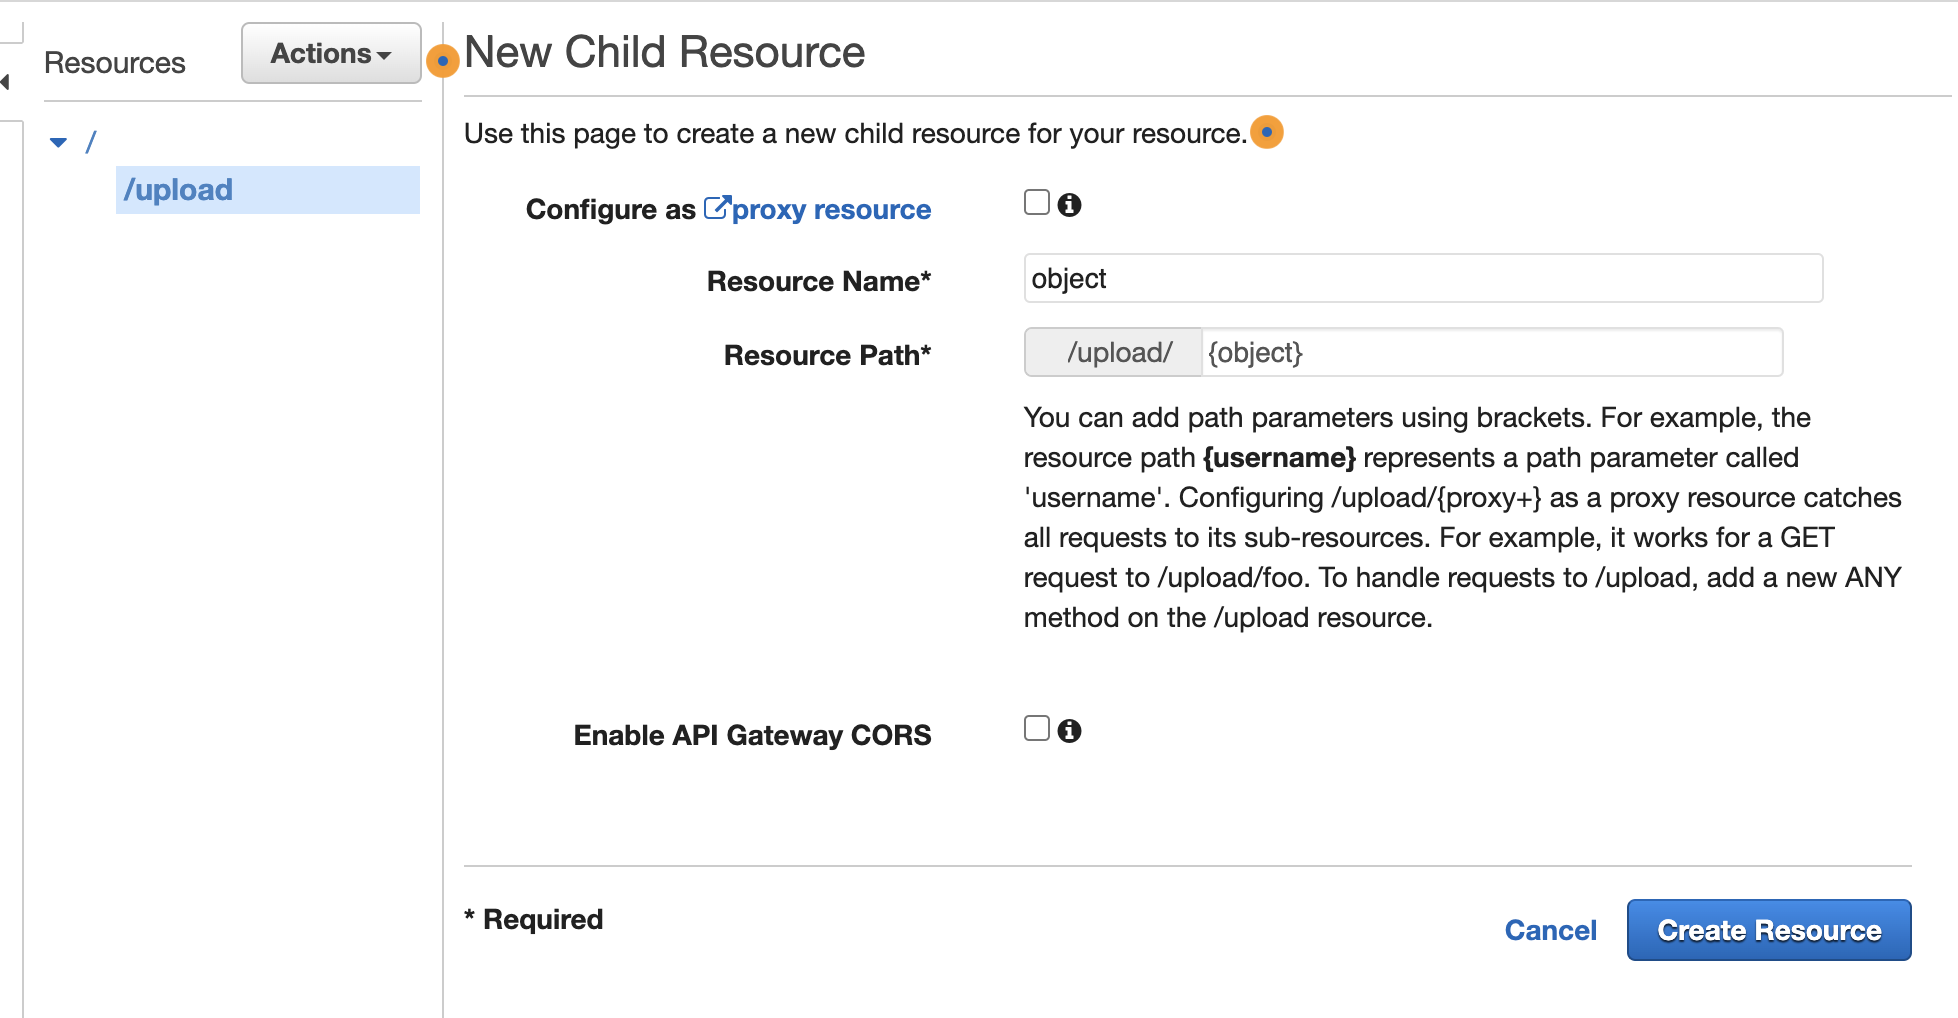
-
Under
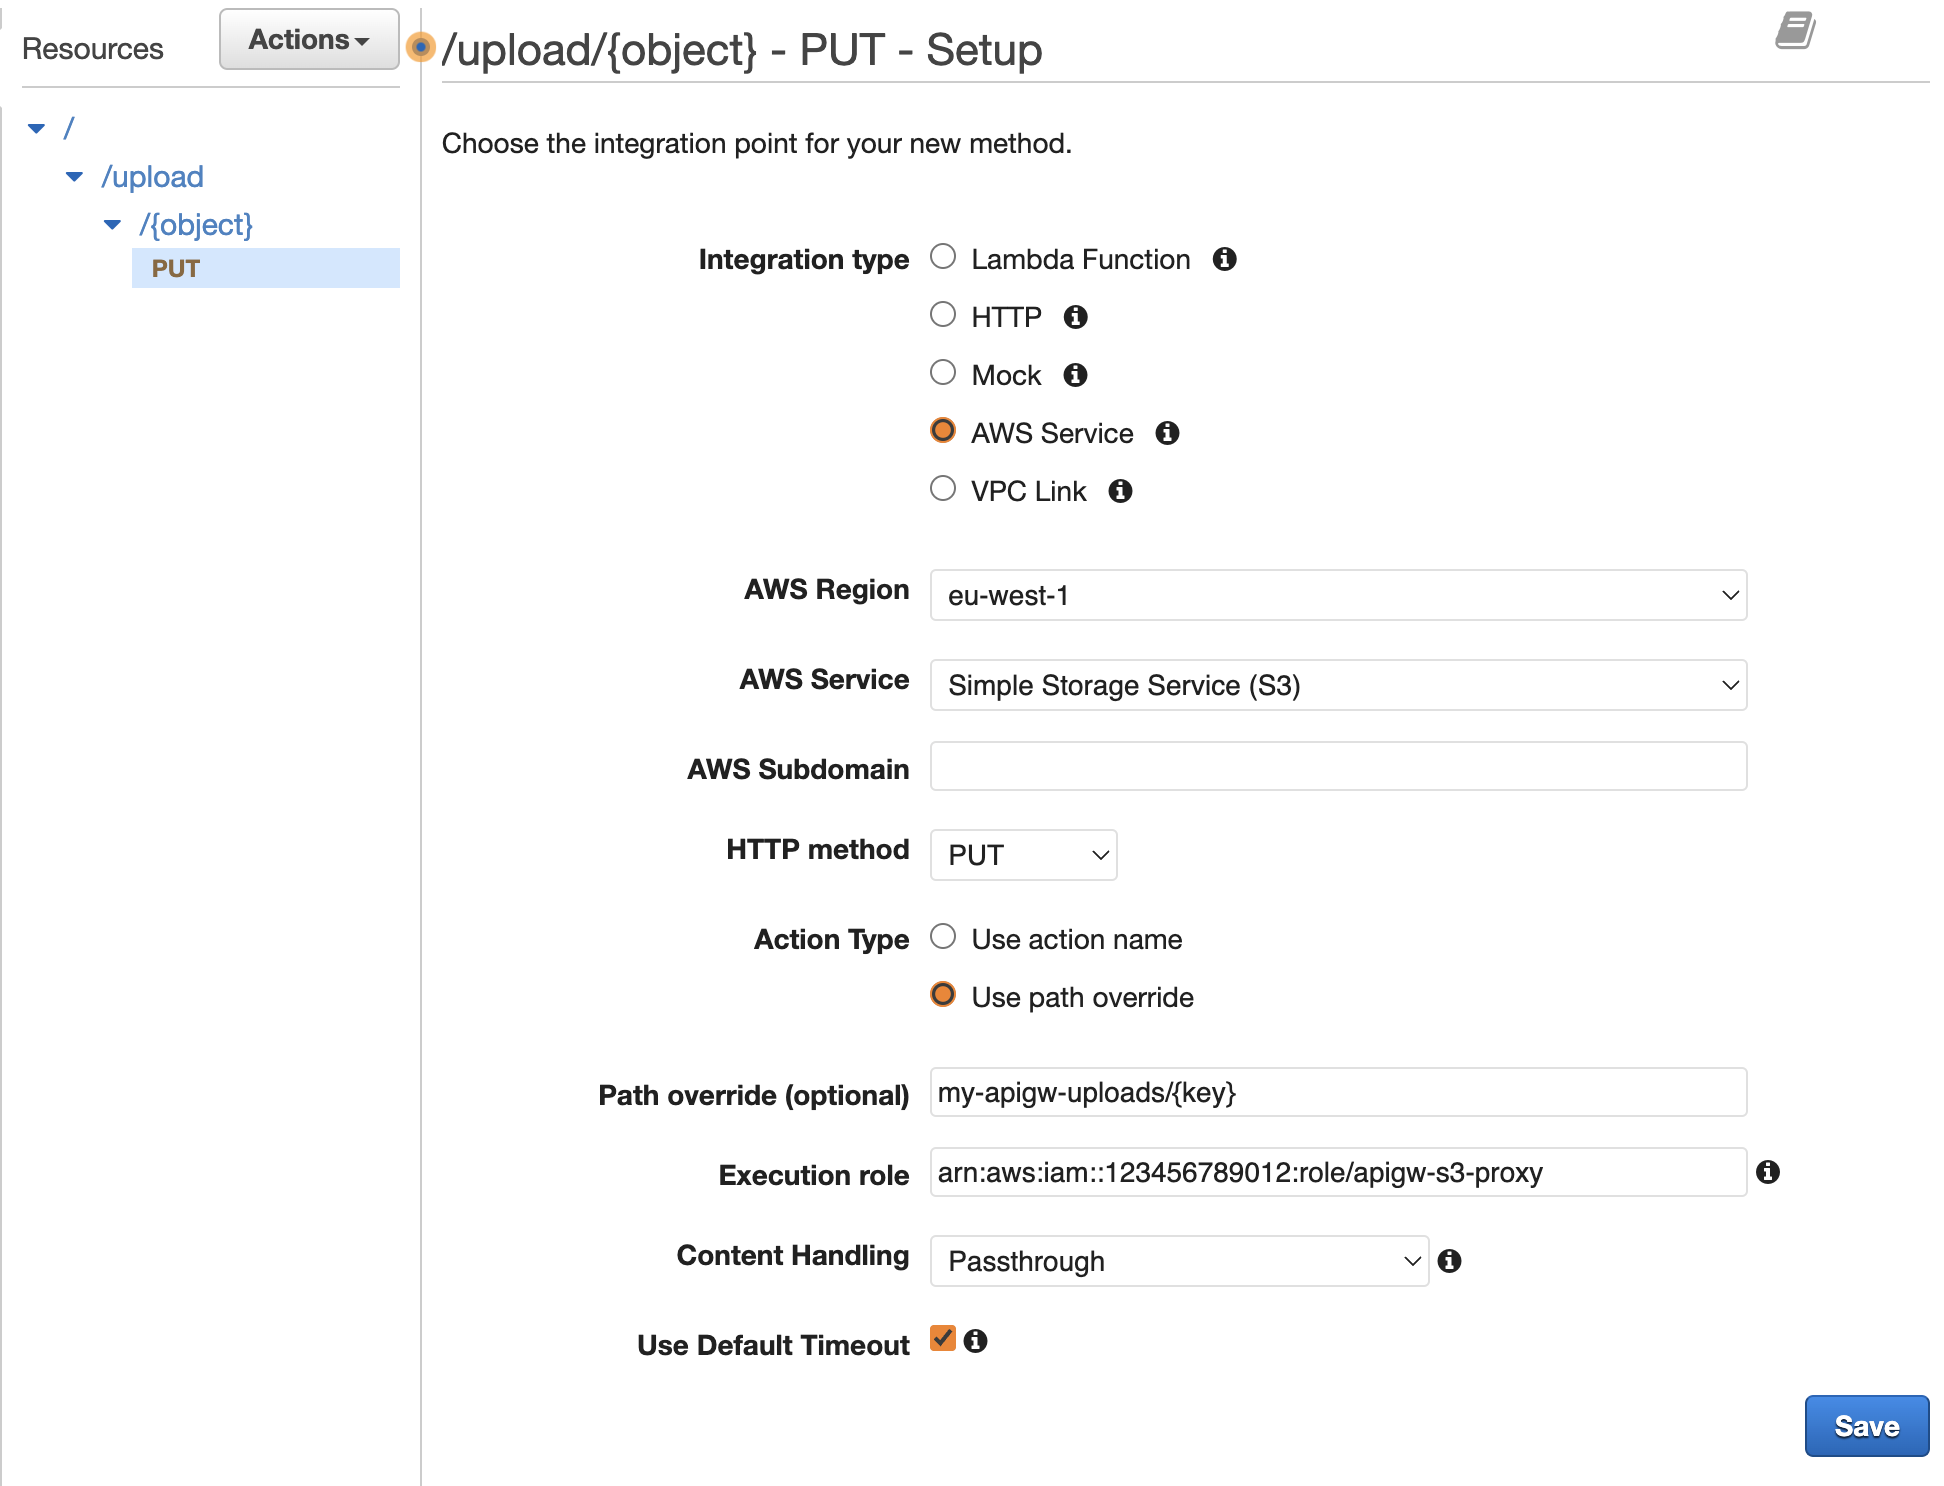
/{object}create a newPUTmethod. For the integration type use AWS Service and enter the following:- AWS Region = the same region used for the S3 bucket
- AWS Service =
Simple Storage Service (S3) - AWS Subdomain = leave blank
- HTTP method =
PUT(this is the HTTP method used to call the S3 API) - Action Type =
use path overide(as we are going to set the S3 bucket and path here) - Path override =
my-apigw-uploads/{key}(remember to use your own S3 bucket name) - Execution role = the
arnfrom the IAM role created earlier. This should haves3:PutObjectpermissions to the specified bucket. - Content Handling =
Passthrough
-
Click save.
-
Under the PUT method select the Integration Request box. Under URL Path Parameters add the following:
- Name =
key - Mapped from =
method.request.path.object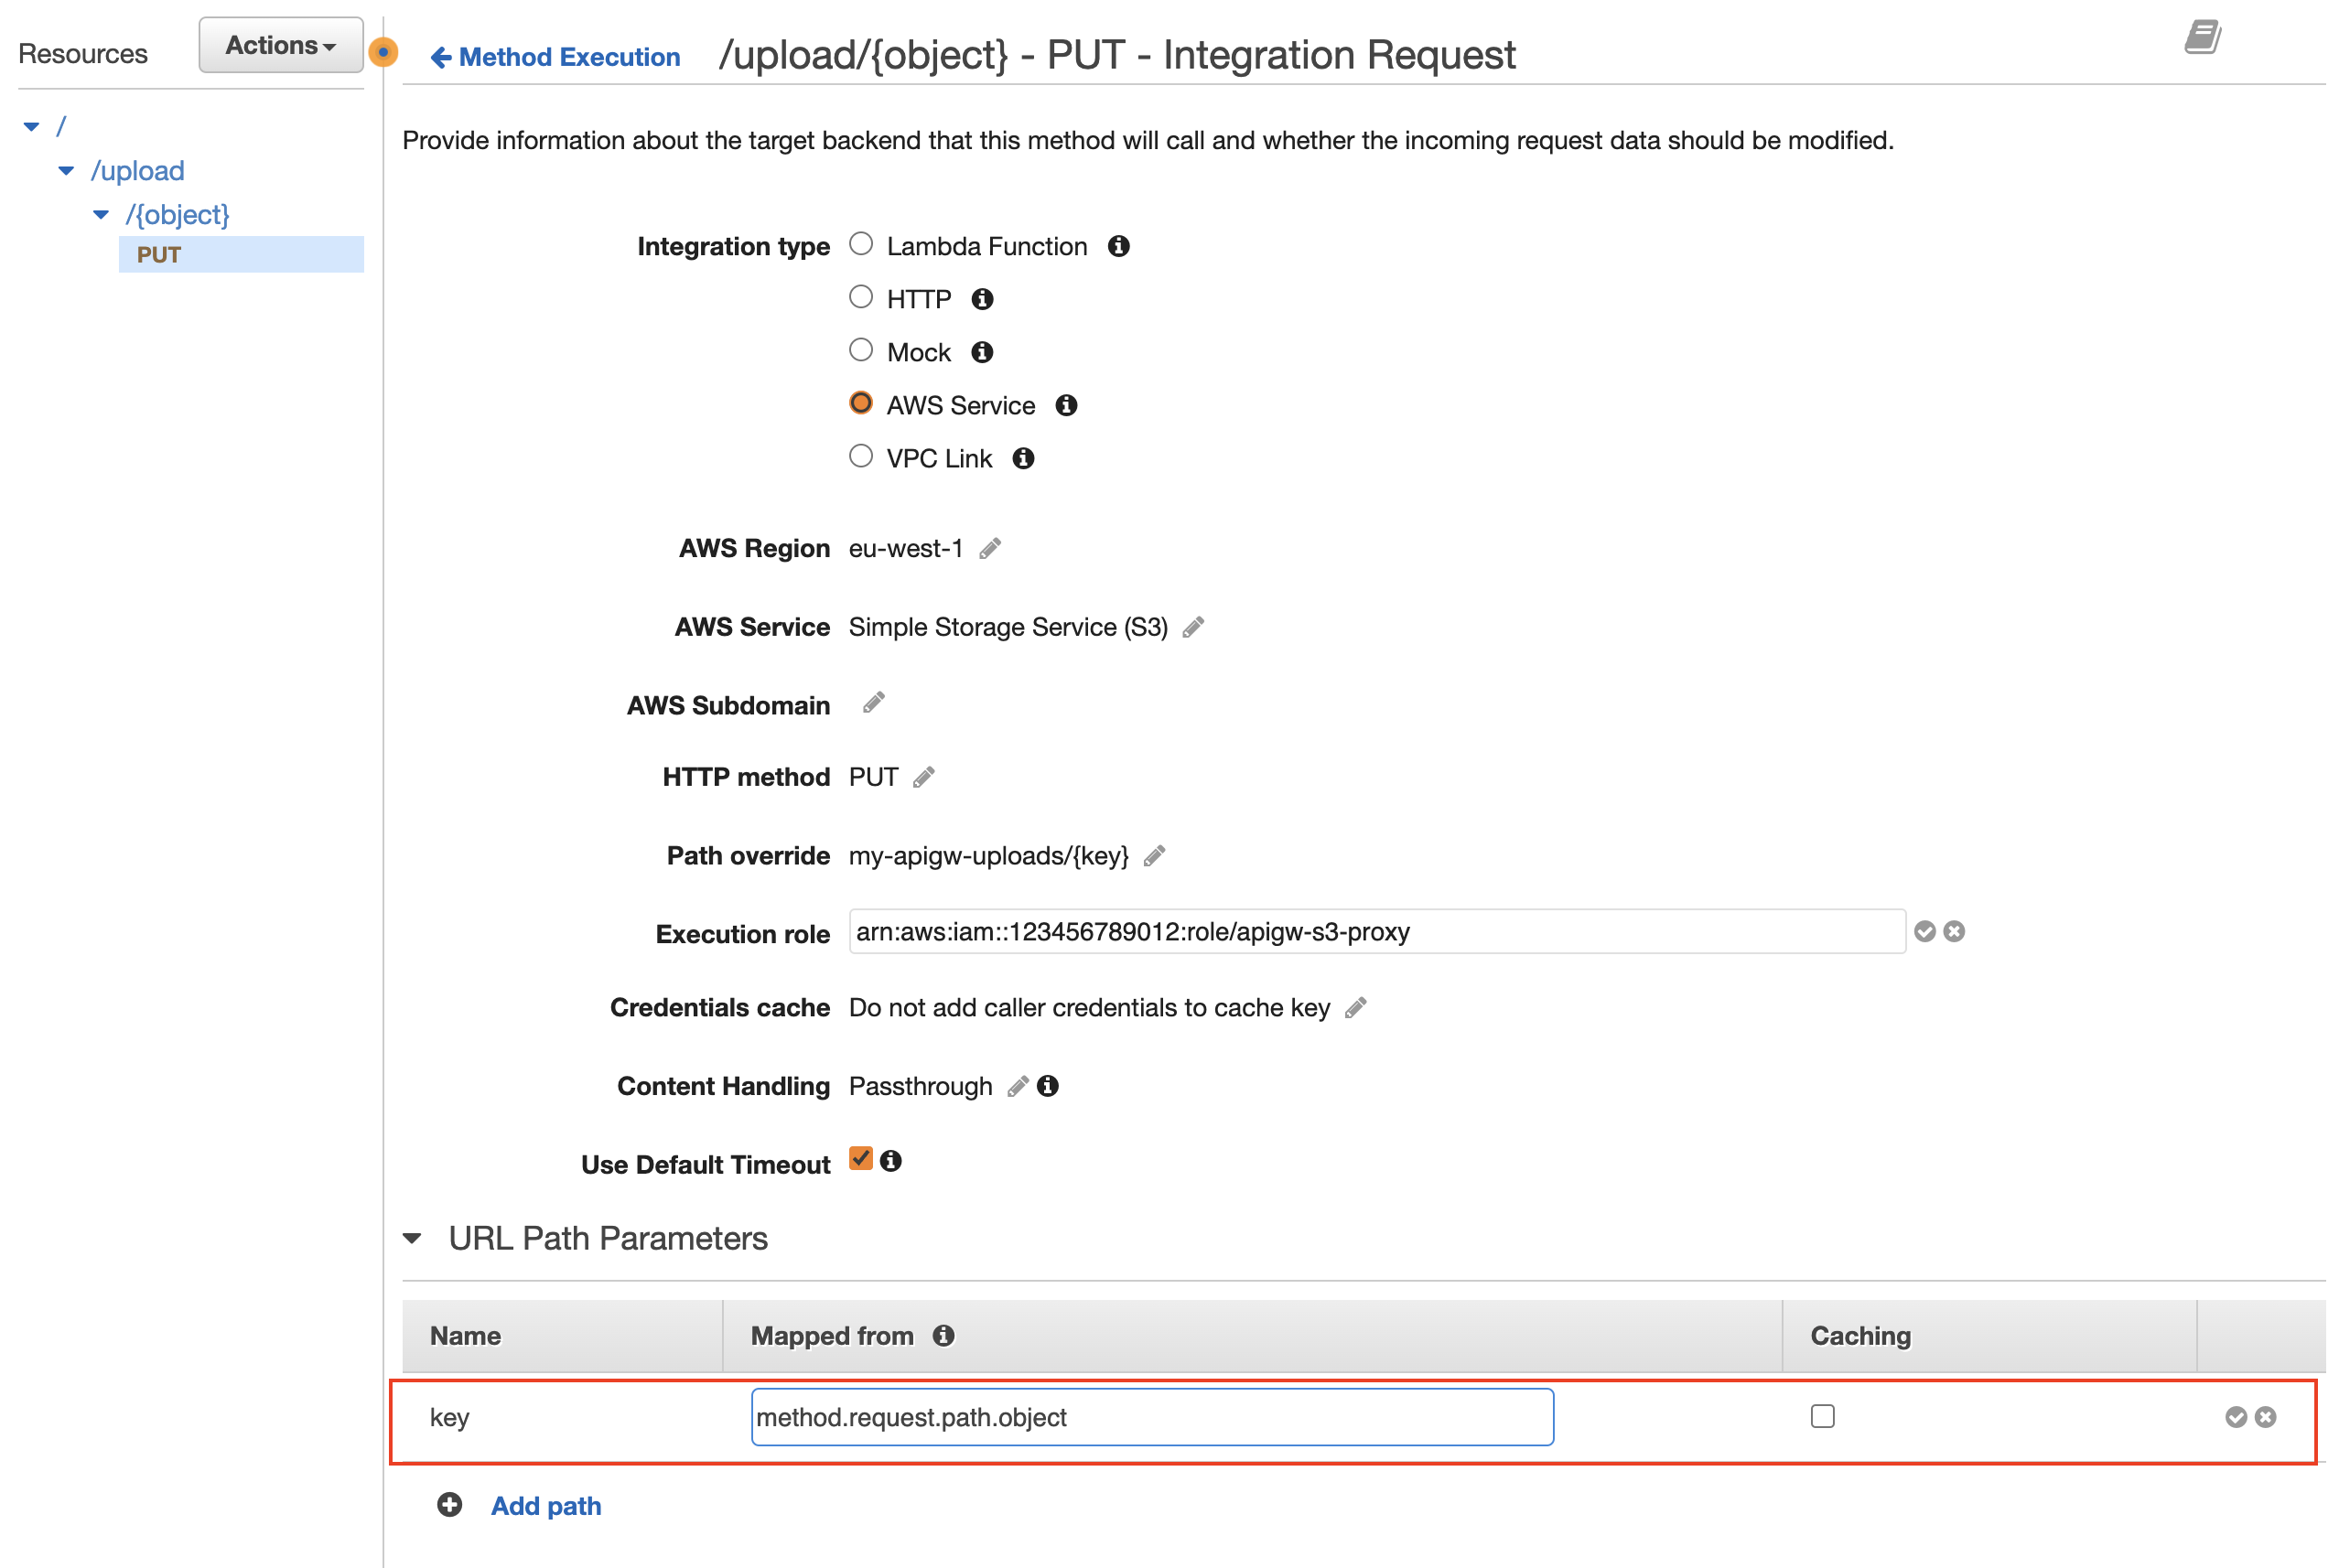 This will map what the user specifies in the URL path (i.e. /{object}) to the path override value {key} (i.e. what the S3 API expects).
- Name =
-
Next on the nagivation pane on the left choose Settings. In the Binary Media Types section choose Add Binary Media Type. Add the string
*/*and click Save changes. You can also use a particular MIME type you want to treat as binary media instead of using a wildcard e.g. image/jpeg. The wildcard will treat all media types as binaries.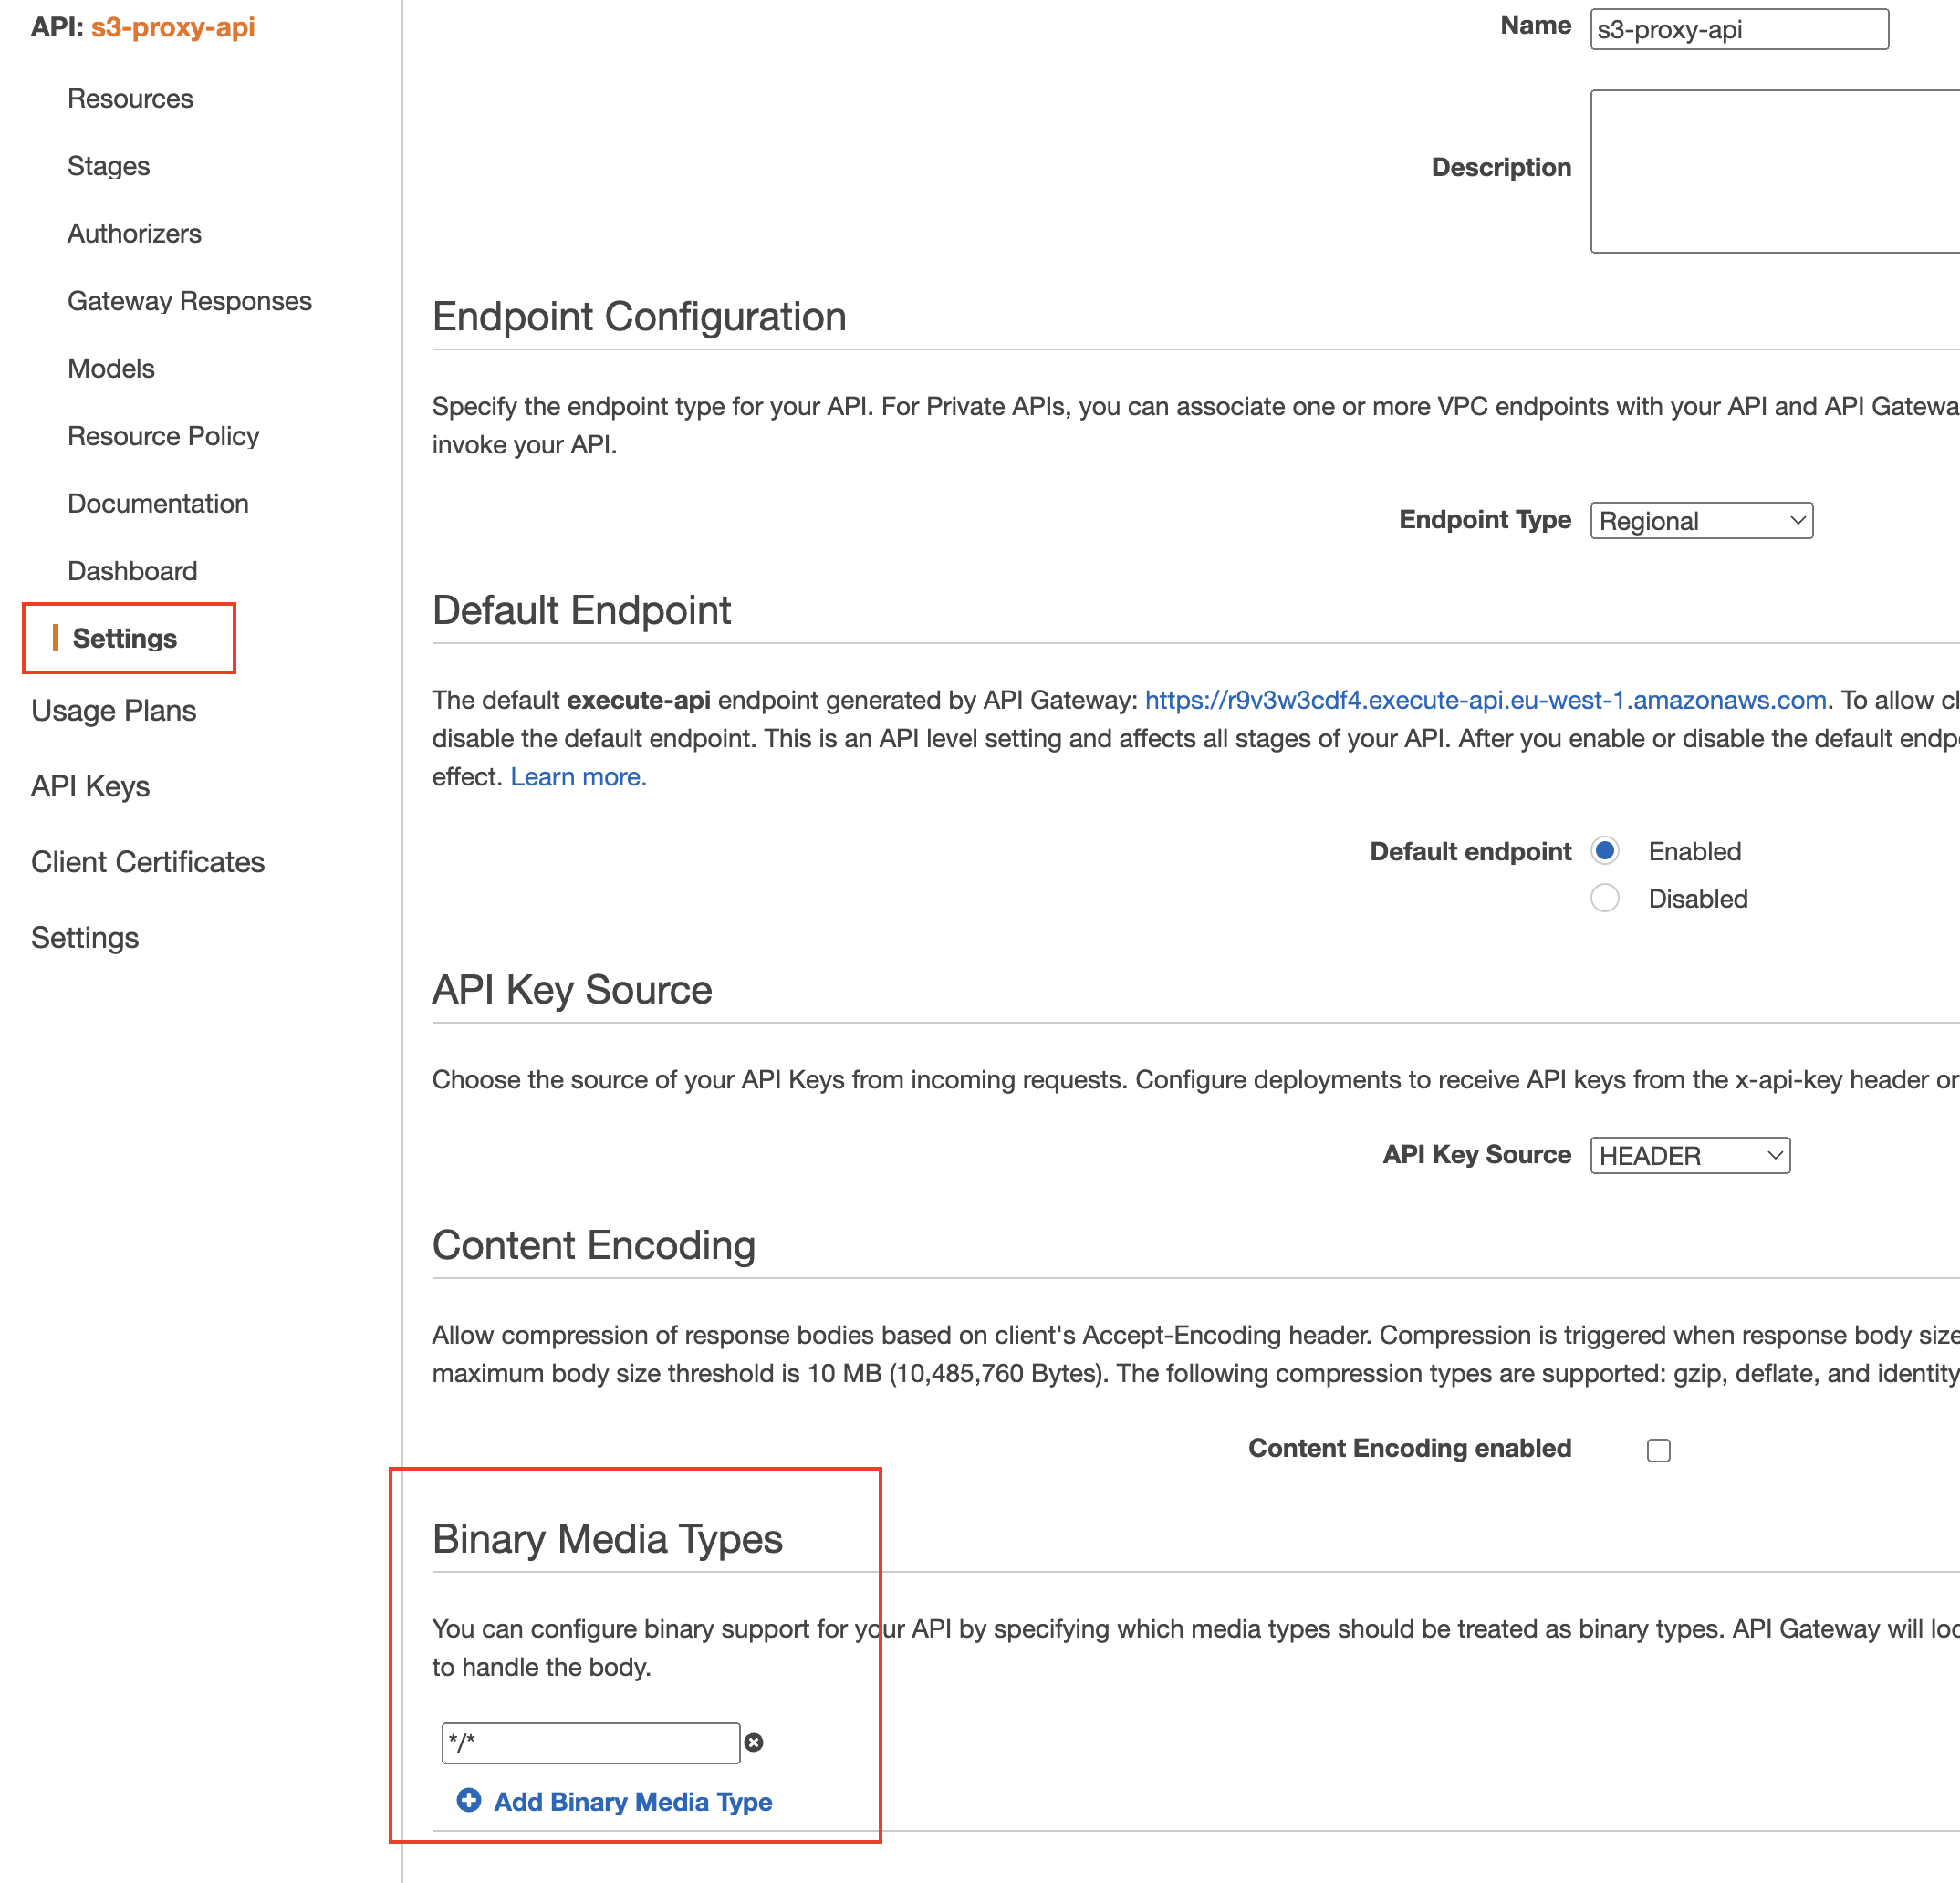
-
All that’s left is to deploy the API to a new stage e.g. v1
-
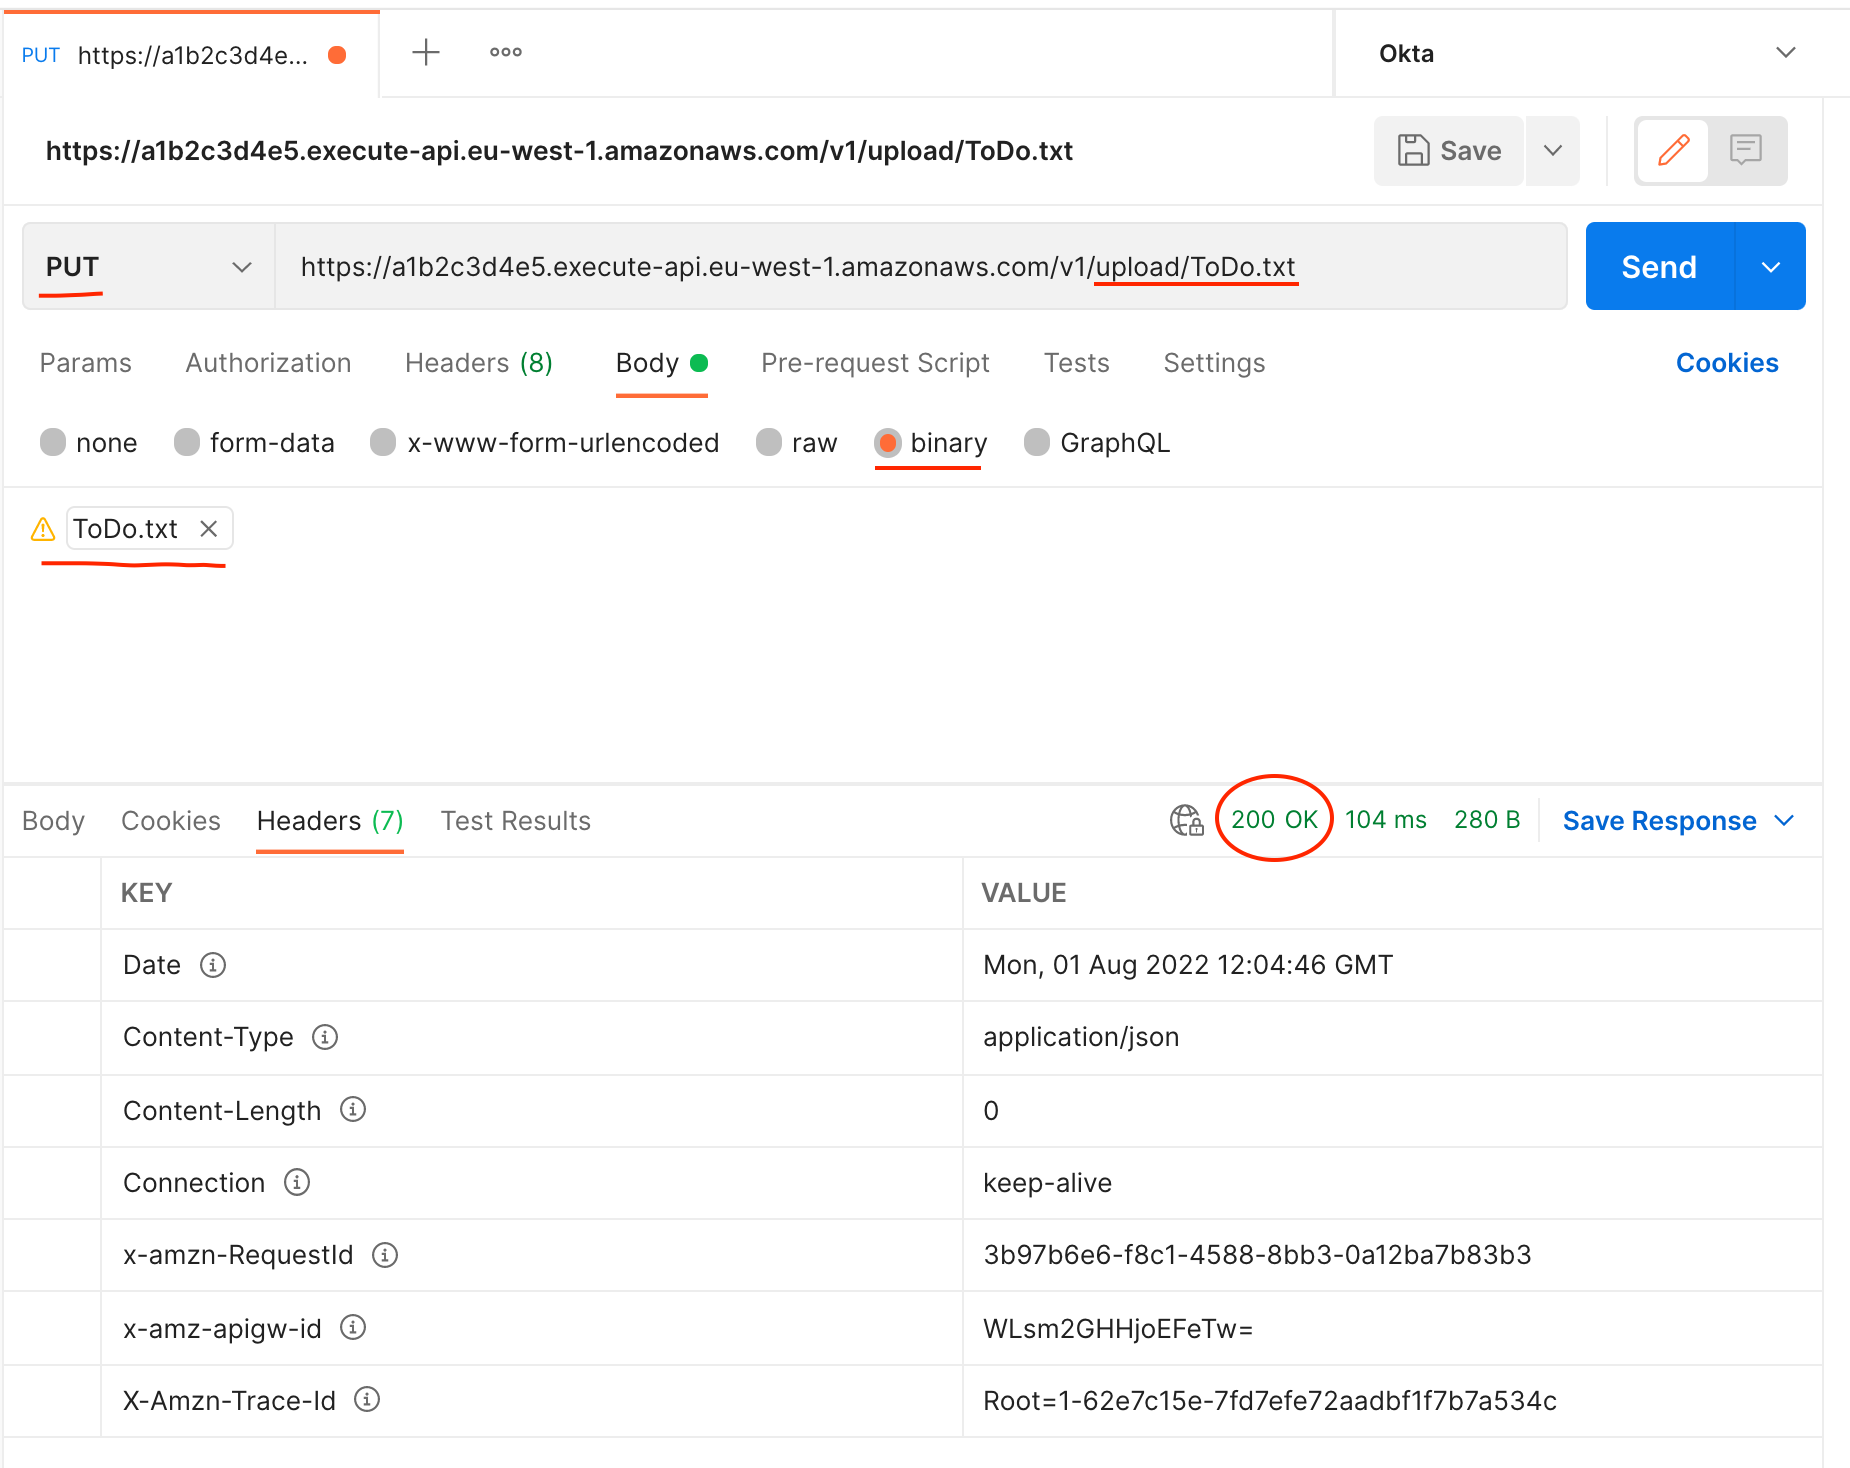
Once the API has deployed we can test the upload using Postman.
- Set the HTTP method to
PUT - Set the URL to the API gateway URL and append
/uploads/<object-name> - Choose
binaryfor theBodytype and upload your desired file (remember - less than 10 MB!) - If successful you will see a
200 OKresponse
- Set the HTTP method to
-
Checking in our S3 bucket we should now see the uploaded file.
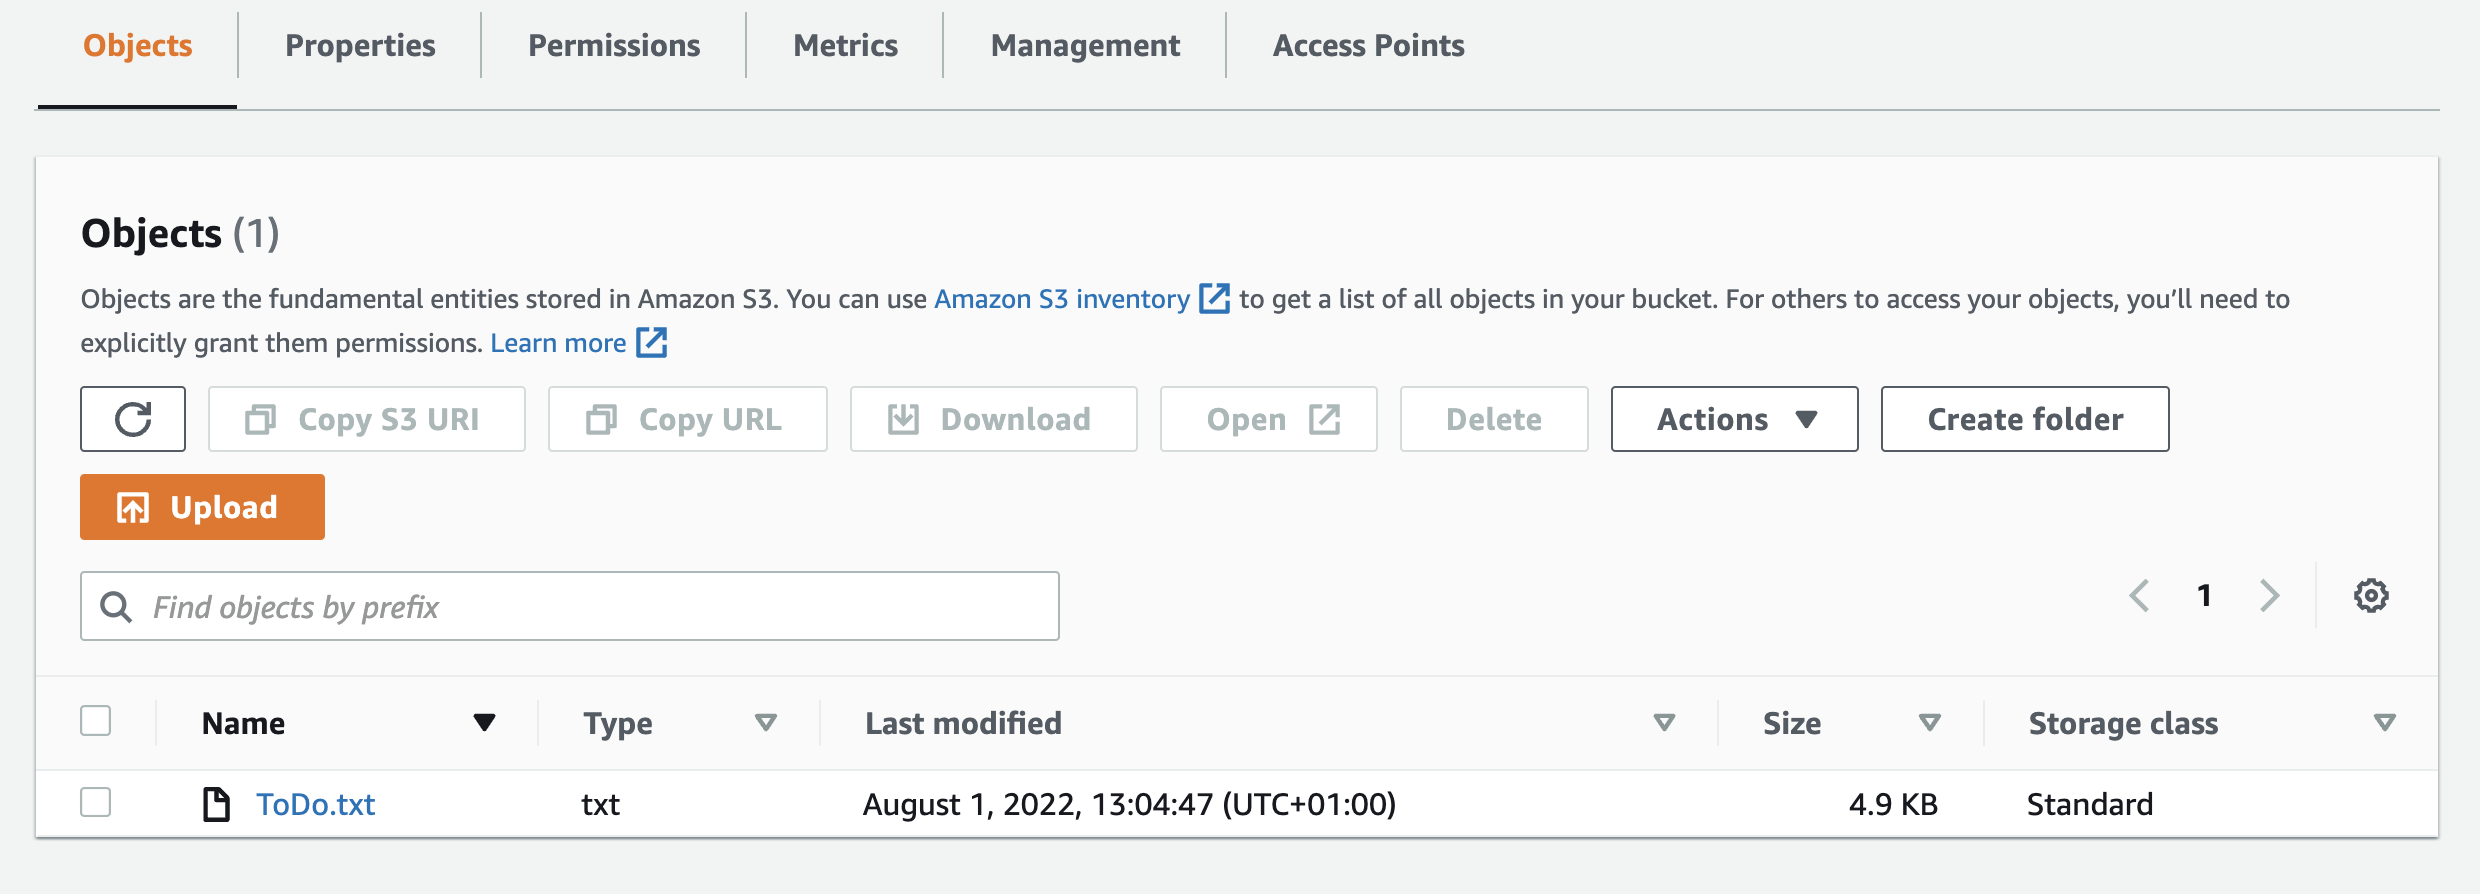
Congratulations! You have now successfully created an API Gateway proxy for S3 uploads. Remember to add some form of authentication to your API to prevent anonymous users from uploading to your S3 storage!
Generating a pre-signed URL for large file upload
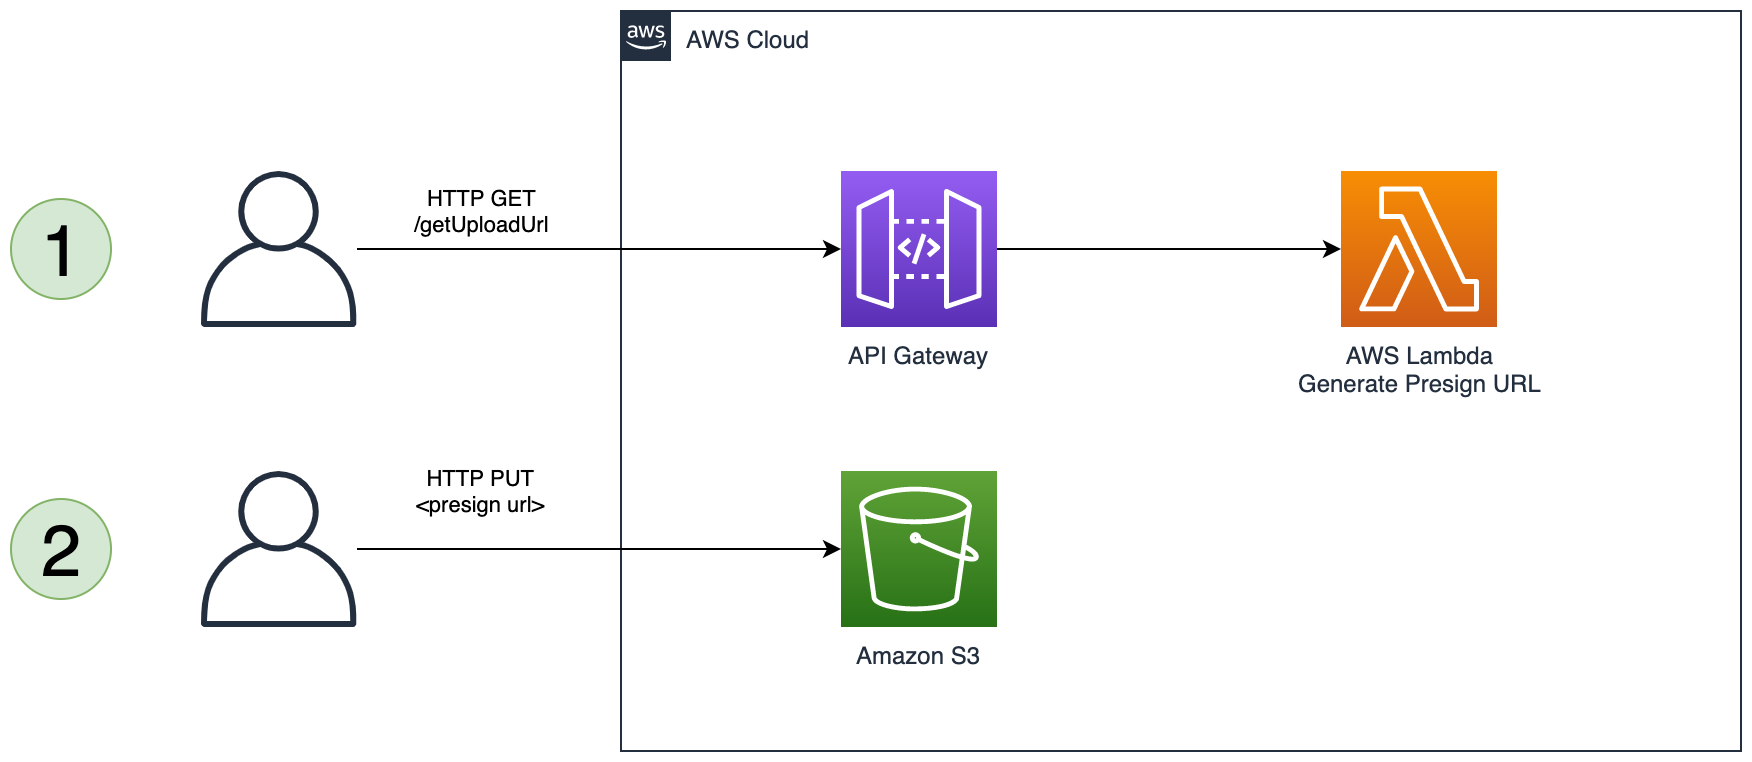
If a file is larger than 10 MB we can still upload it to S3 via a presigned URL generated by API Gateway. This does require two calls from the client, but will allow files up to 5 GB in size (this is the maximum file size for a single PUT operation).
Note: objects larger than 5 GB must be uploaded using a multipart upload using the AWS SDK, AWS CLI or REST API. This will then allow an object up to 5 TB in size.
-
Create an S3 bucket to be used for the uploads e.g.
my-apigw-uploads -
Create a new Lambda function in the same region as the S3 bucket using your lanaguage of choice (this article uses Python 3.9).
-
Add permissions to the generated Lambda IAM Role to allow it to create presigned urls. Use the below policy as an example. (Note: presigned URLs must be created by someone who has the permission to perform the operation. In our case s3:PutObject. There is no specific action to allow presigned urls to be generated.)
{ "Version": "2012-10-17", "Statement": [ { "Sid": "APIGWPutAllow", "Effect": "Allow", "Action": "s3:PutObject", "Resource": "arn:aws:s3:::my-apigw-uploads/*" } ] } -
Copy and deploy the Lambda function code below. In this case we are using the boto3 SDK for Python and the generate_presigned_url() API call.
import json import boto3 s3_client = boto3.client('s3') bucket_name = 'my-apigw-uploads' content_type = 'text/plain' # This could also come from the API Gateway HTTP headers. expiration = '3600' def lambda_handler(event, context): object_name = event['pathParameters']['object'] # Use the {object} path parameter response = s3_client.generate_presigned_url('put_object', Params={'Bucket': bucket_name, 'Key': object_name, 'ContentType': content_type }, ExpiresIn=expiration, ) return { 'statusCode': 200, 'body': json.dumps(response) # The response contains the presigned URL } -
Create a new API Gateway REST API and give it a name e.g.
s3-presign-api -
Create a new resource name
/upload, with a child resource{object}. Create aGETmethod under the{object}resource. Set the integration type toLambda Functionand make sure to selectUse Lambda Proxy integration.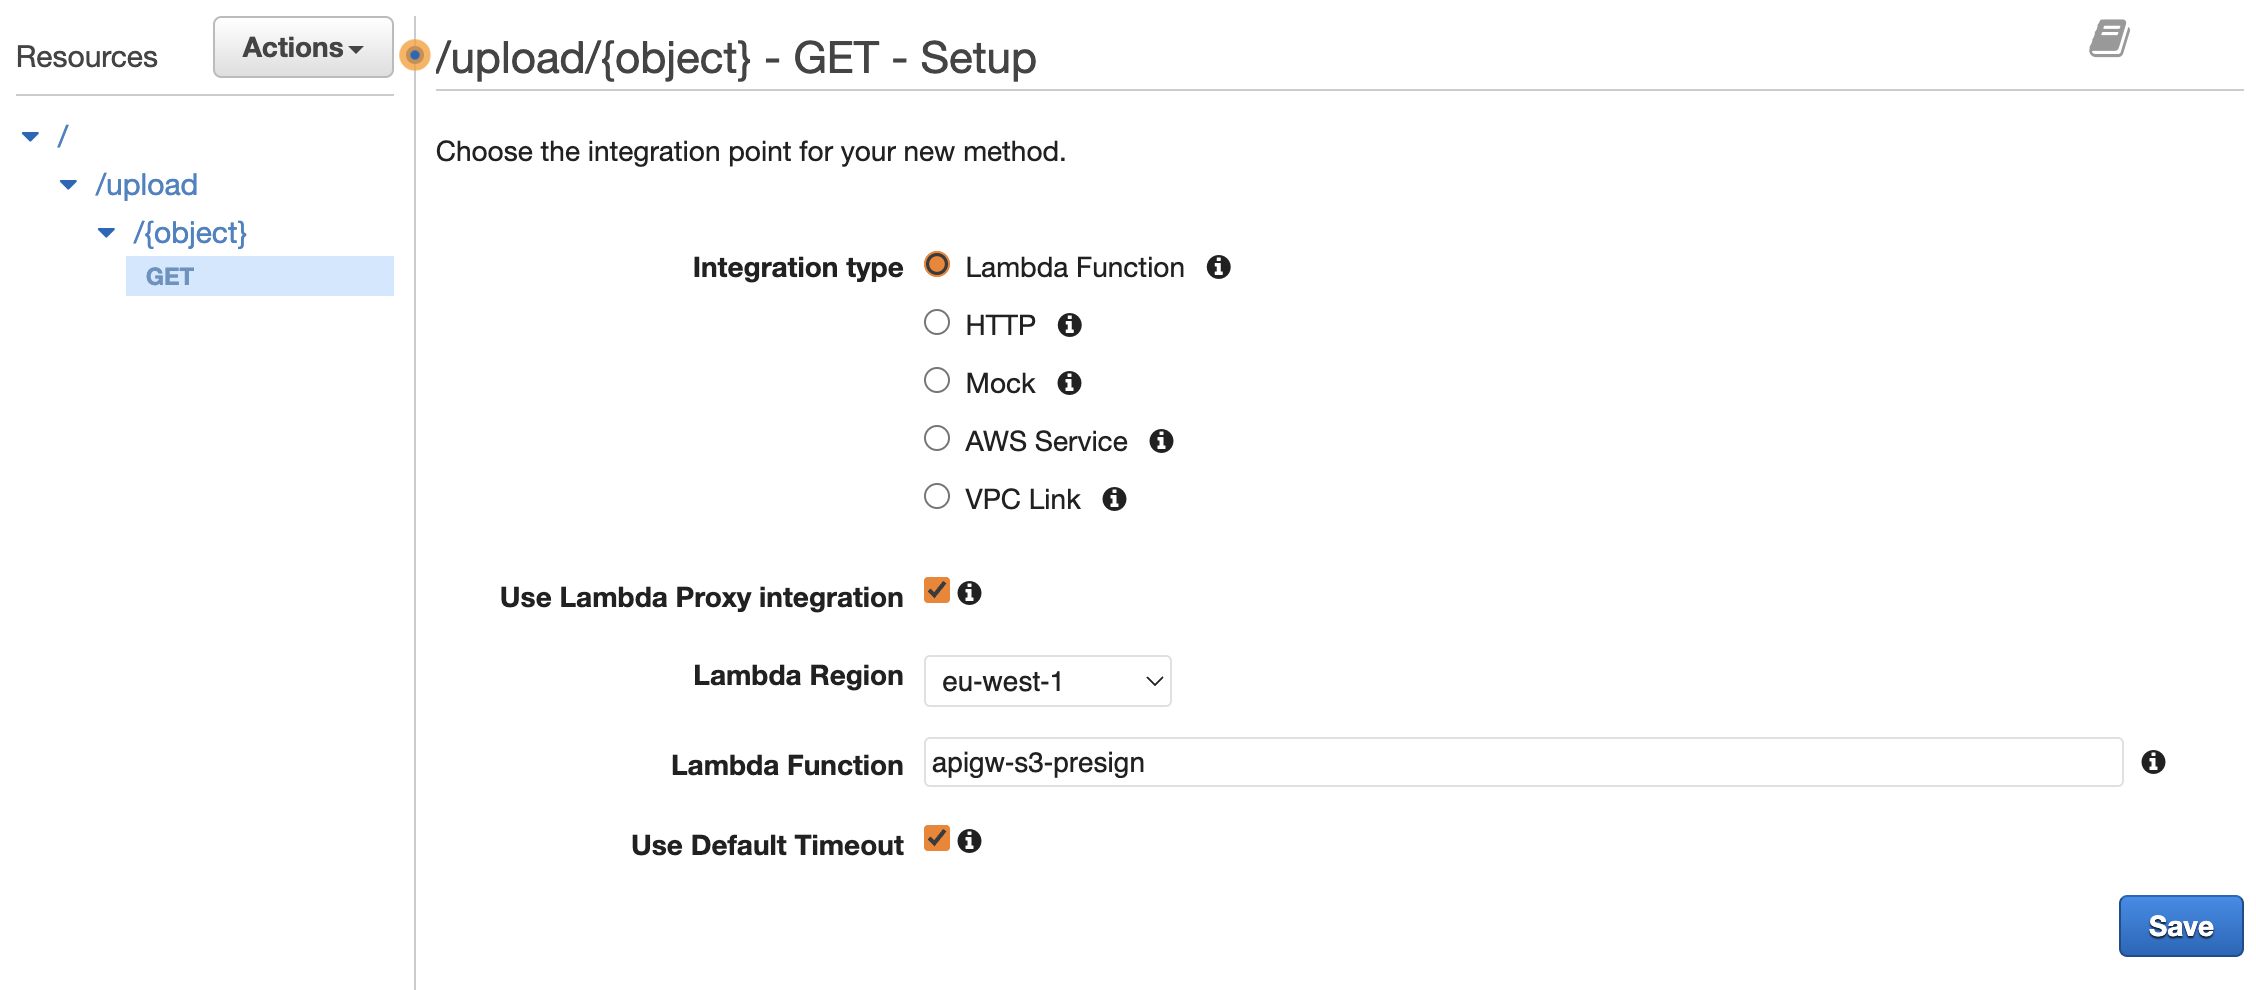
-
Click Save and click OK when asked to give API Gateway permissions.
-
All that’s left now is to deploy the API to a new stage e.g.
v1and test! -
To test use Postman
-
First make a
GETcall to the API Gateway generated URL e.g.https://a1b2c3d4.execute-api.eu-west-1.amazonaws.com/v1/upload/test.txt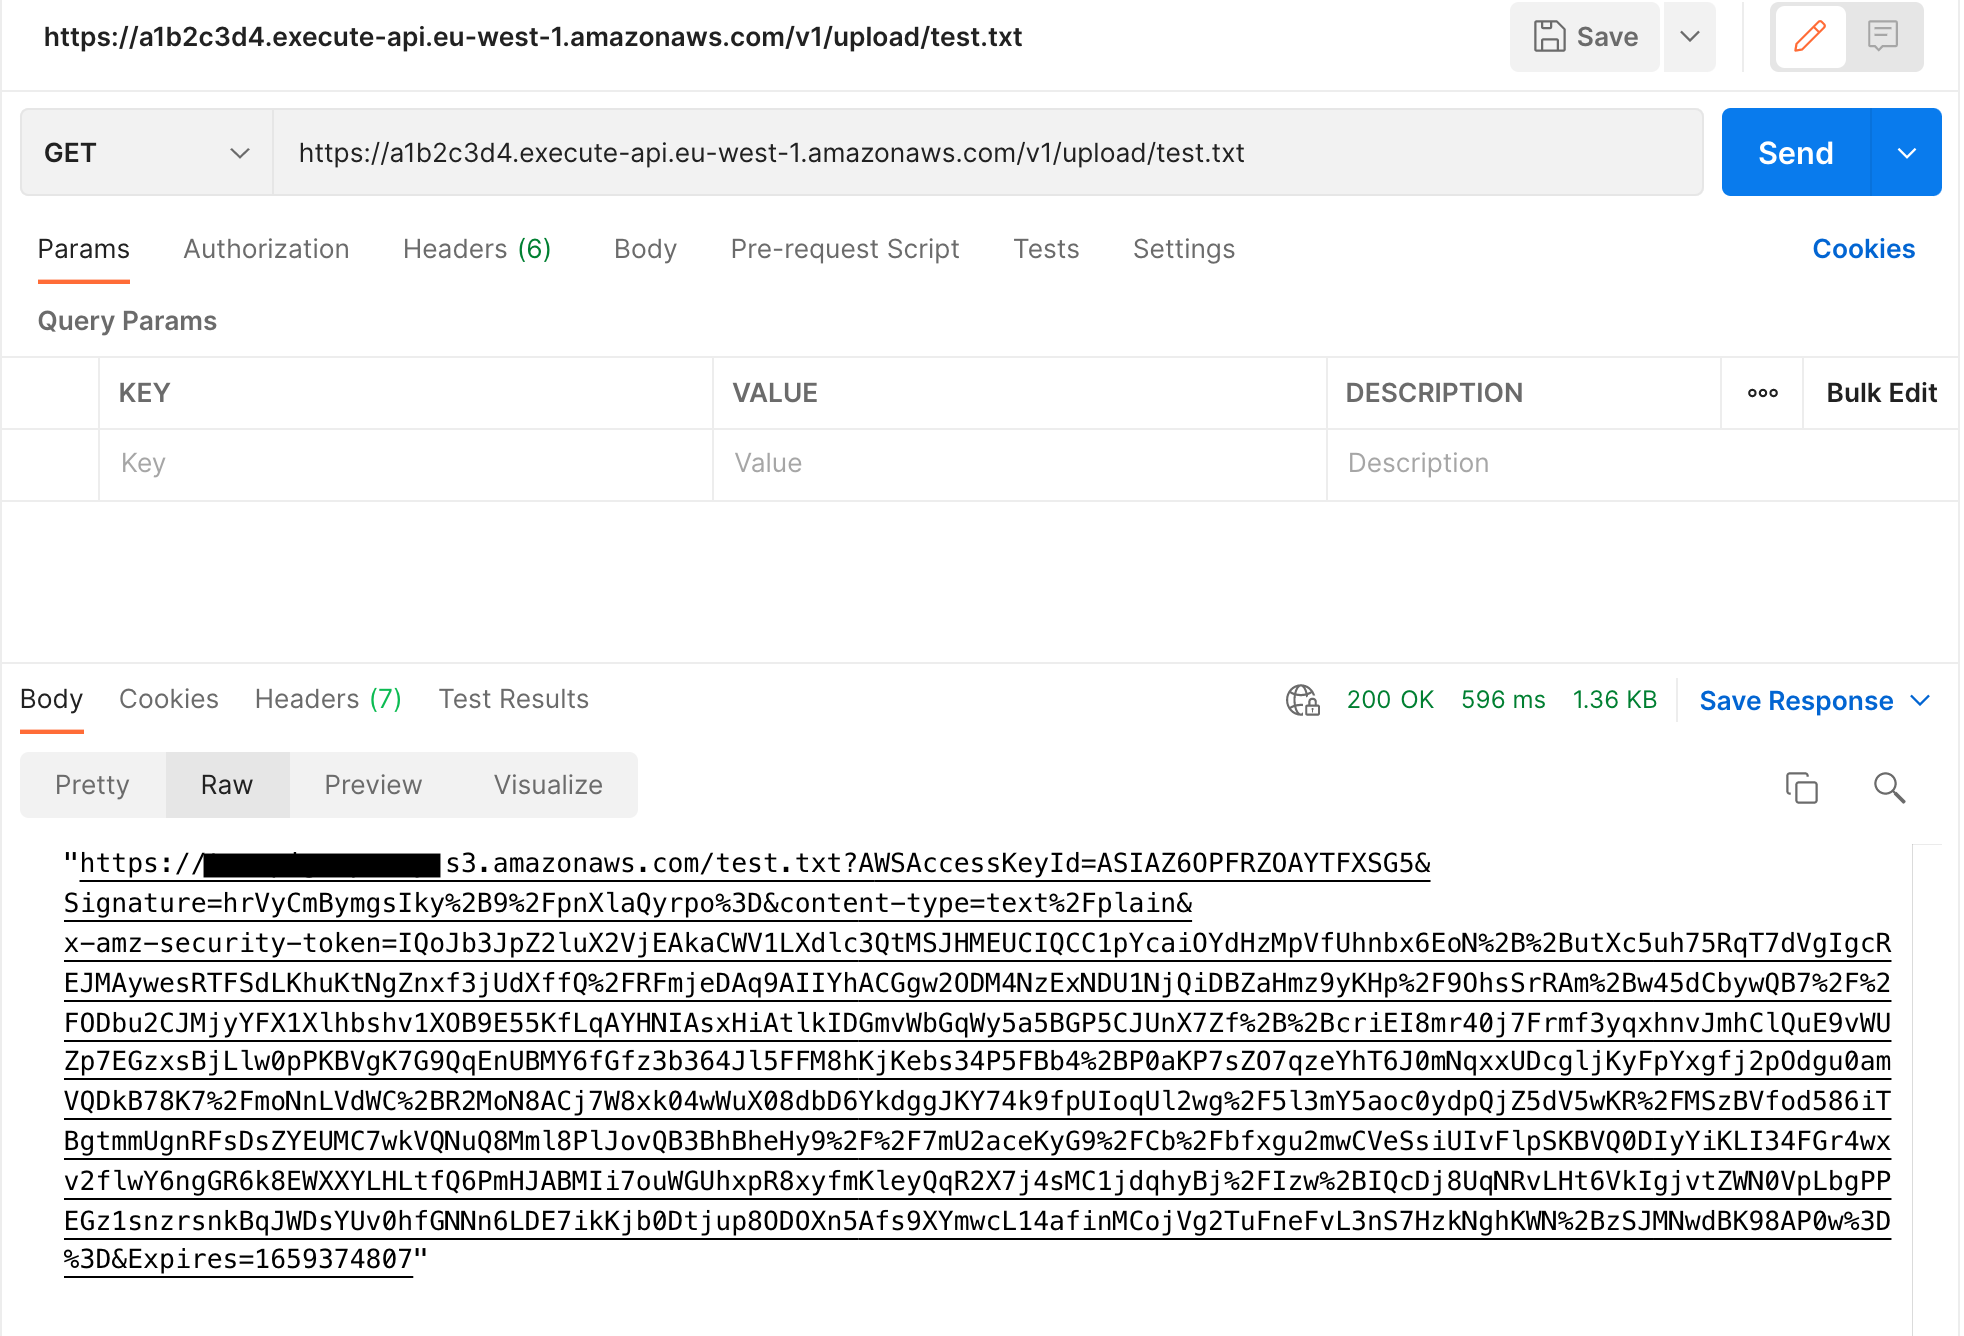
-
Use the returned pre-signed URL to make a
PUTcall with your selected binary as the body.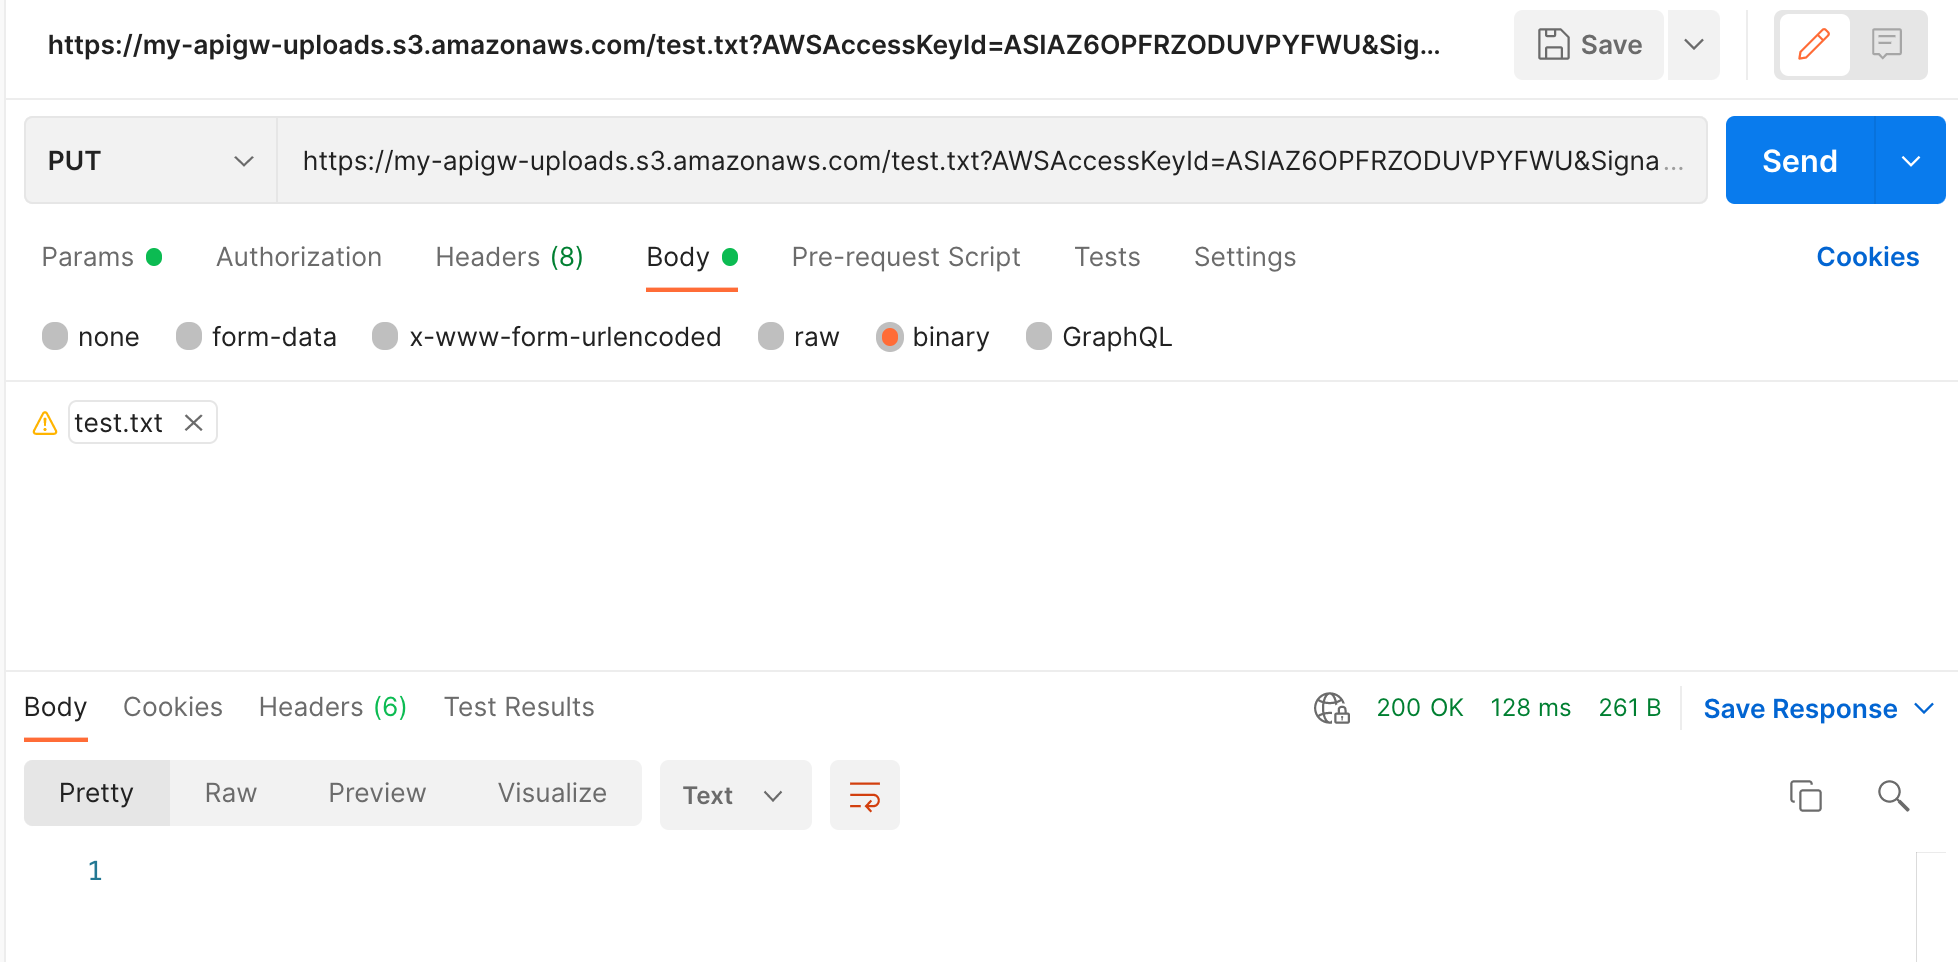
If successful you will recieve a
HTTP 200response. You should also find your uploaded file in the S3 bucket! -
Alternative option: Proxy using CloudFront and Lambda@Edge
 This is actually a fairly simple option. It uses CloudFront in front of an S3 bucket to proxy the PUT requests. You can then use Lambda@Edge to perform your own authentication. This method will allow a max file size of 5 GB.
-
Create an S3 bucket to be used for the uploads e.g.
my-apigw-uploads -
In the CloudFront Console create a new distribution with the following settings (leave everything else default):
- Origin domain = your S3 bucket
- S3 bucket access =
Yes use OAI(create a new OAI and say yes to update bucket policy)
- View protocol policy =
HTTPS only - Allowed HTTP methods =
GET, HEAD, OPTIONS, PUT, POST, PATCH, DELETE(we need PUT!) - Cache policy =
CachingDisabled(we don’t need to cache anything)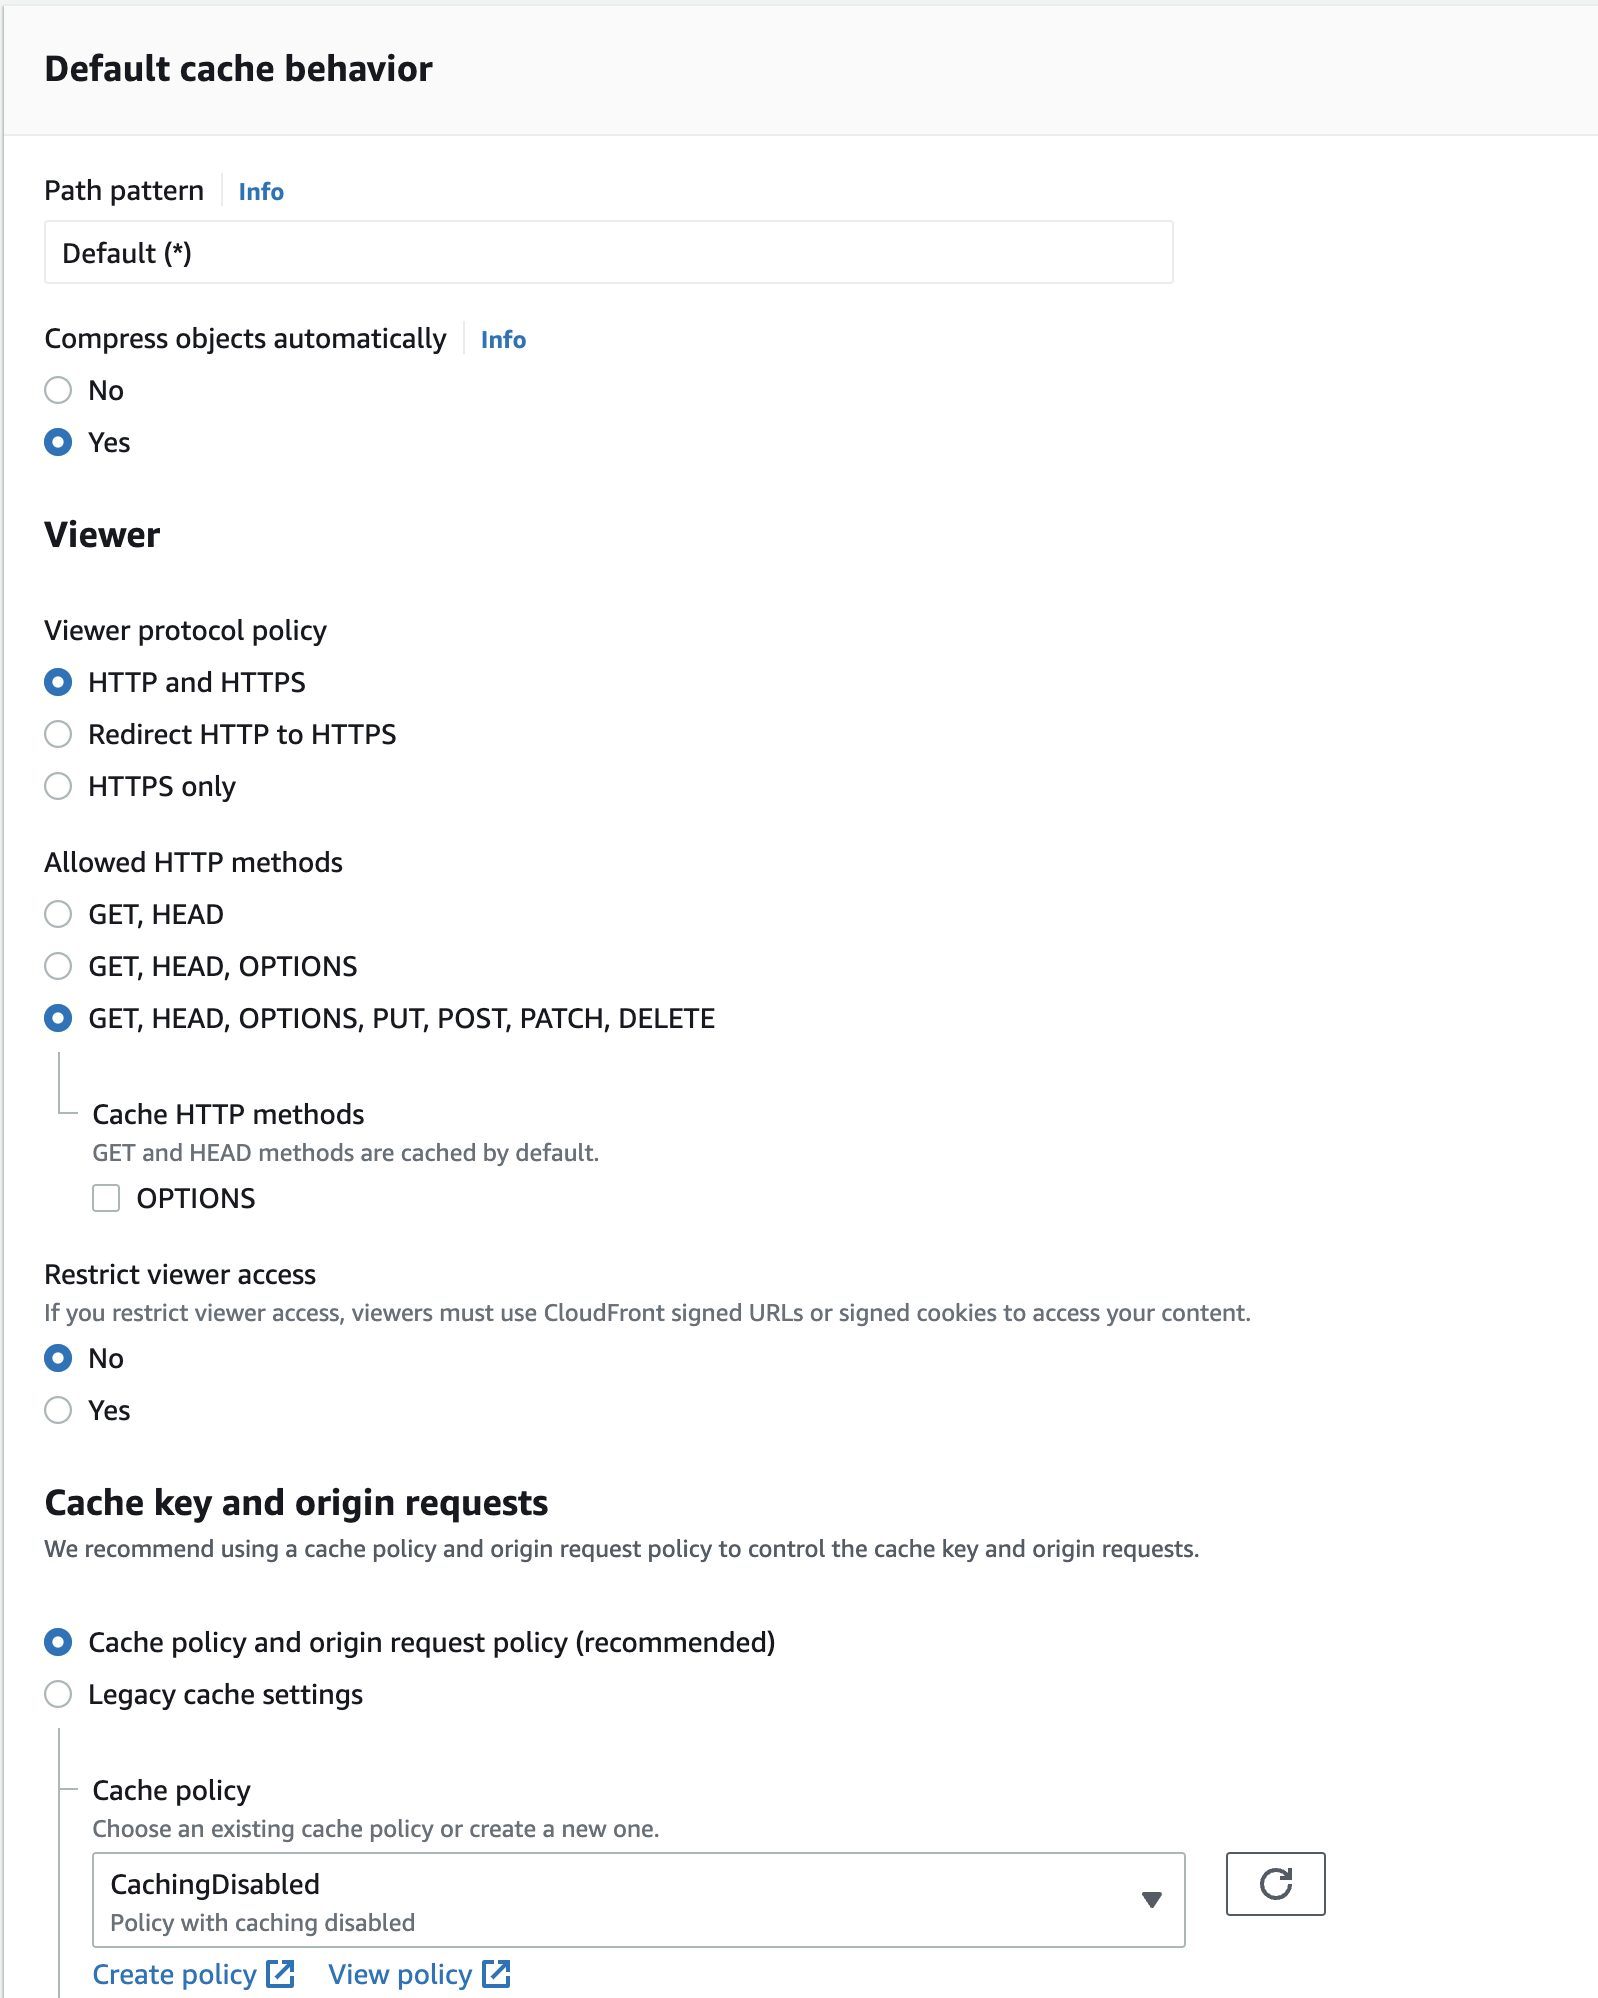
-
Leave everything else as default and click Create distribution
-
Once the distibution has been created go back to the S3 Console and select the bucket created earlier. Now edit the S3 bucket policy to change the default OAI permission from
s3:GetObjecttos3:PutObject. This will allow uploads and prevent any read operations.{ "Version": "2008-10-17", "Id": "PolicyForCloudFrontPrivateContent", "Statement": [ { "Sid": "1", "Effect": "Allow", "Principal": { "AWS": "arn:aws:iam::cloudfront:user/CloudFront Origin Access Identity E2VEV1F34O3TP0" }, "Action": [ "s3:PutObject" ], "Resource": "arn:aws:s3:::my-apigw-uploads/*" } ] } -
At this point you should be able to test an upload as there is no authentication with Lambda@Edge yet. Use Postman to submit a
PUTrequest tohttps://<your-cloudfront-distro>/<s3-object-name>. You should receive200 OKif successful.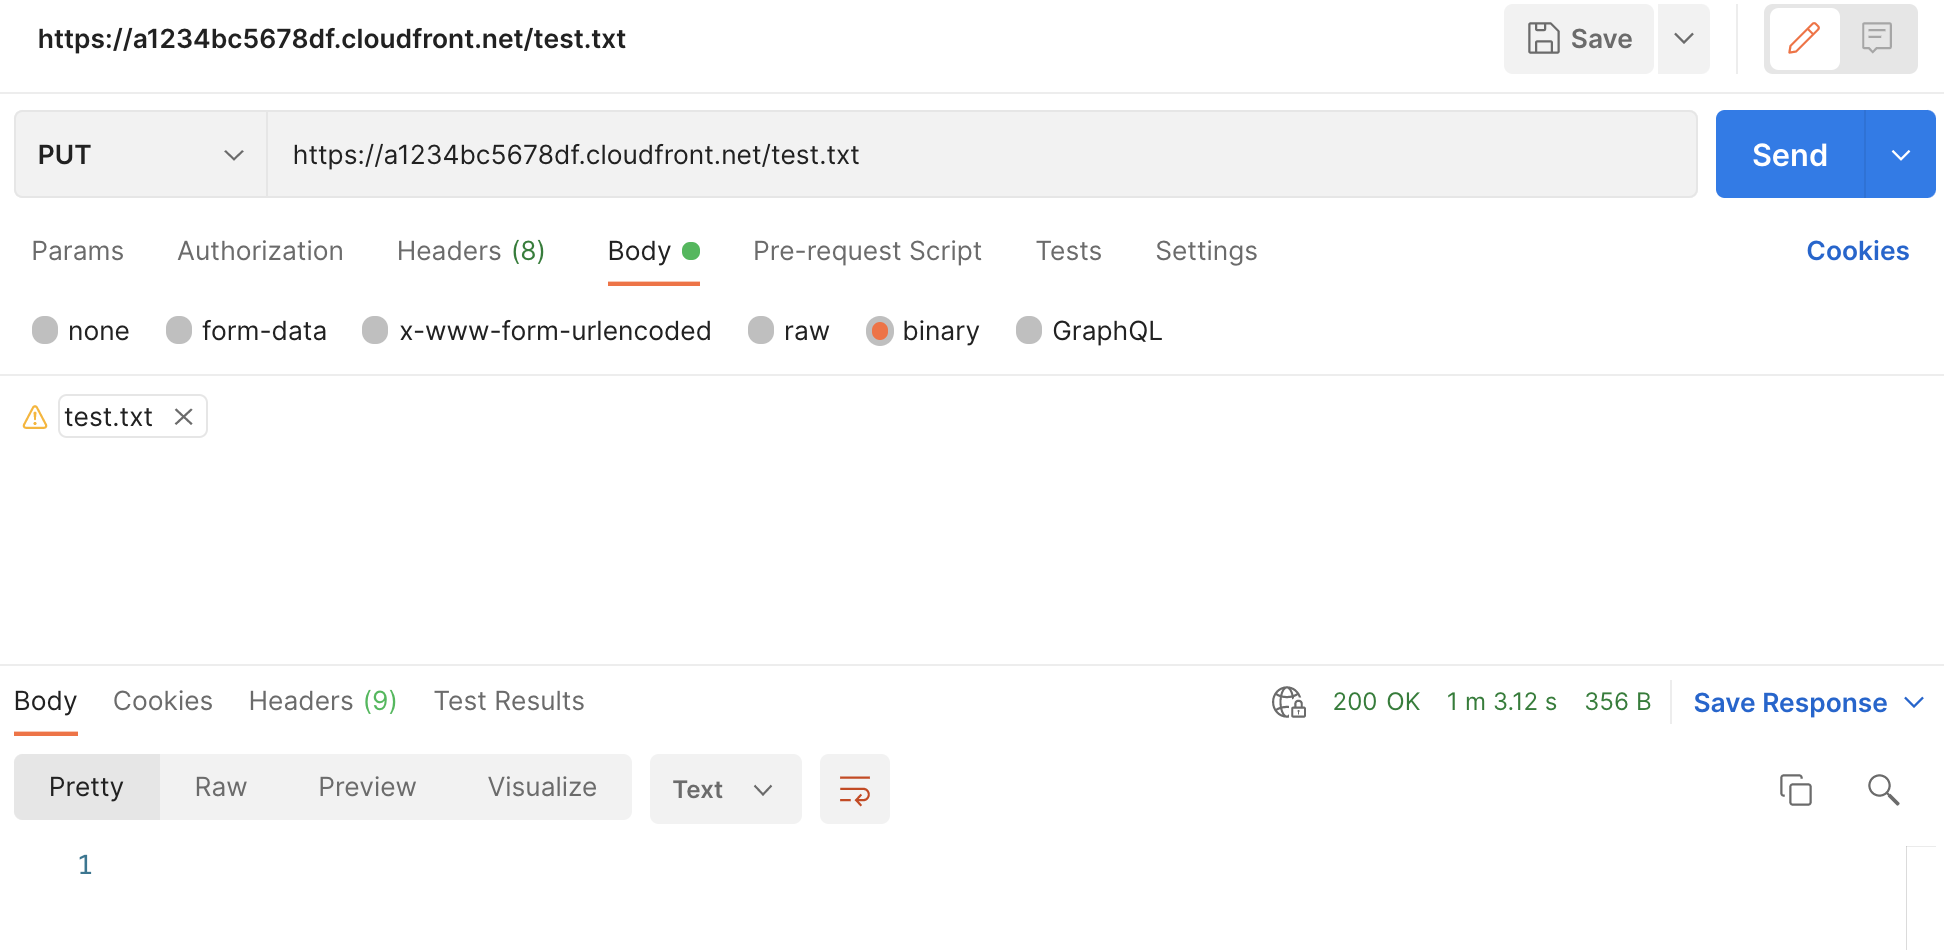
-
As a final step let’s introduce some authentication with Lambda@Edge. Create a new Lambda function in
us-east-1 (N. Virginia)(us-east-1 is a requirement for Lambda@Edge functions). For the execution role make sure to use the policy templateBasic Lambda@Edge permissions (for CloudFront trigger). I am using Python 3.9 as the language.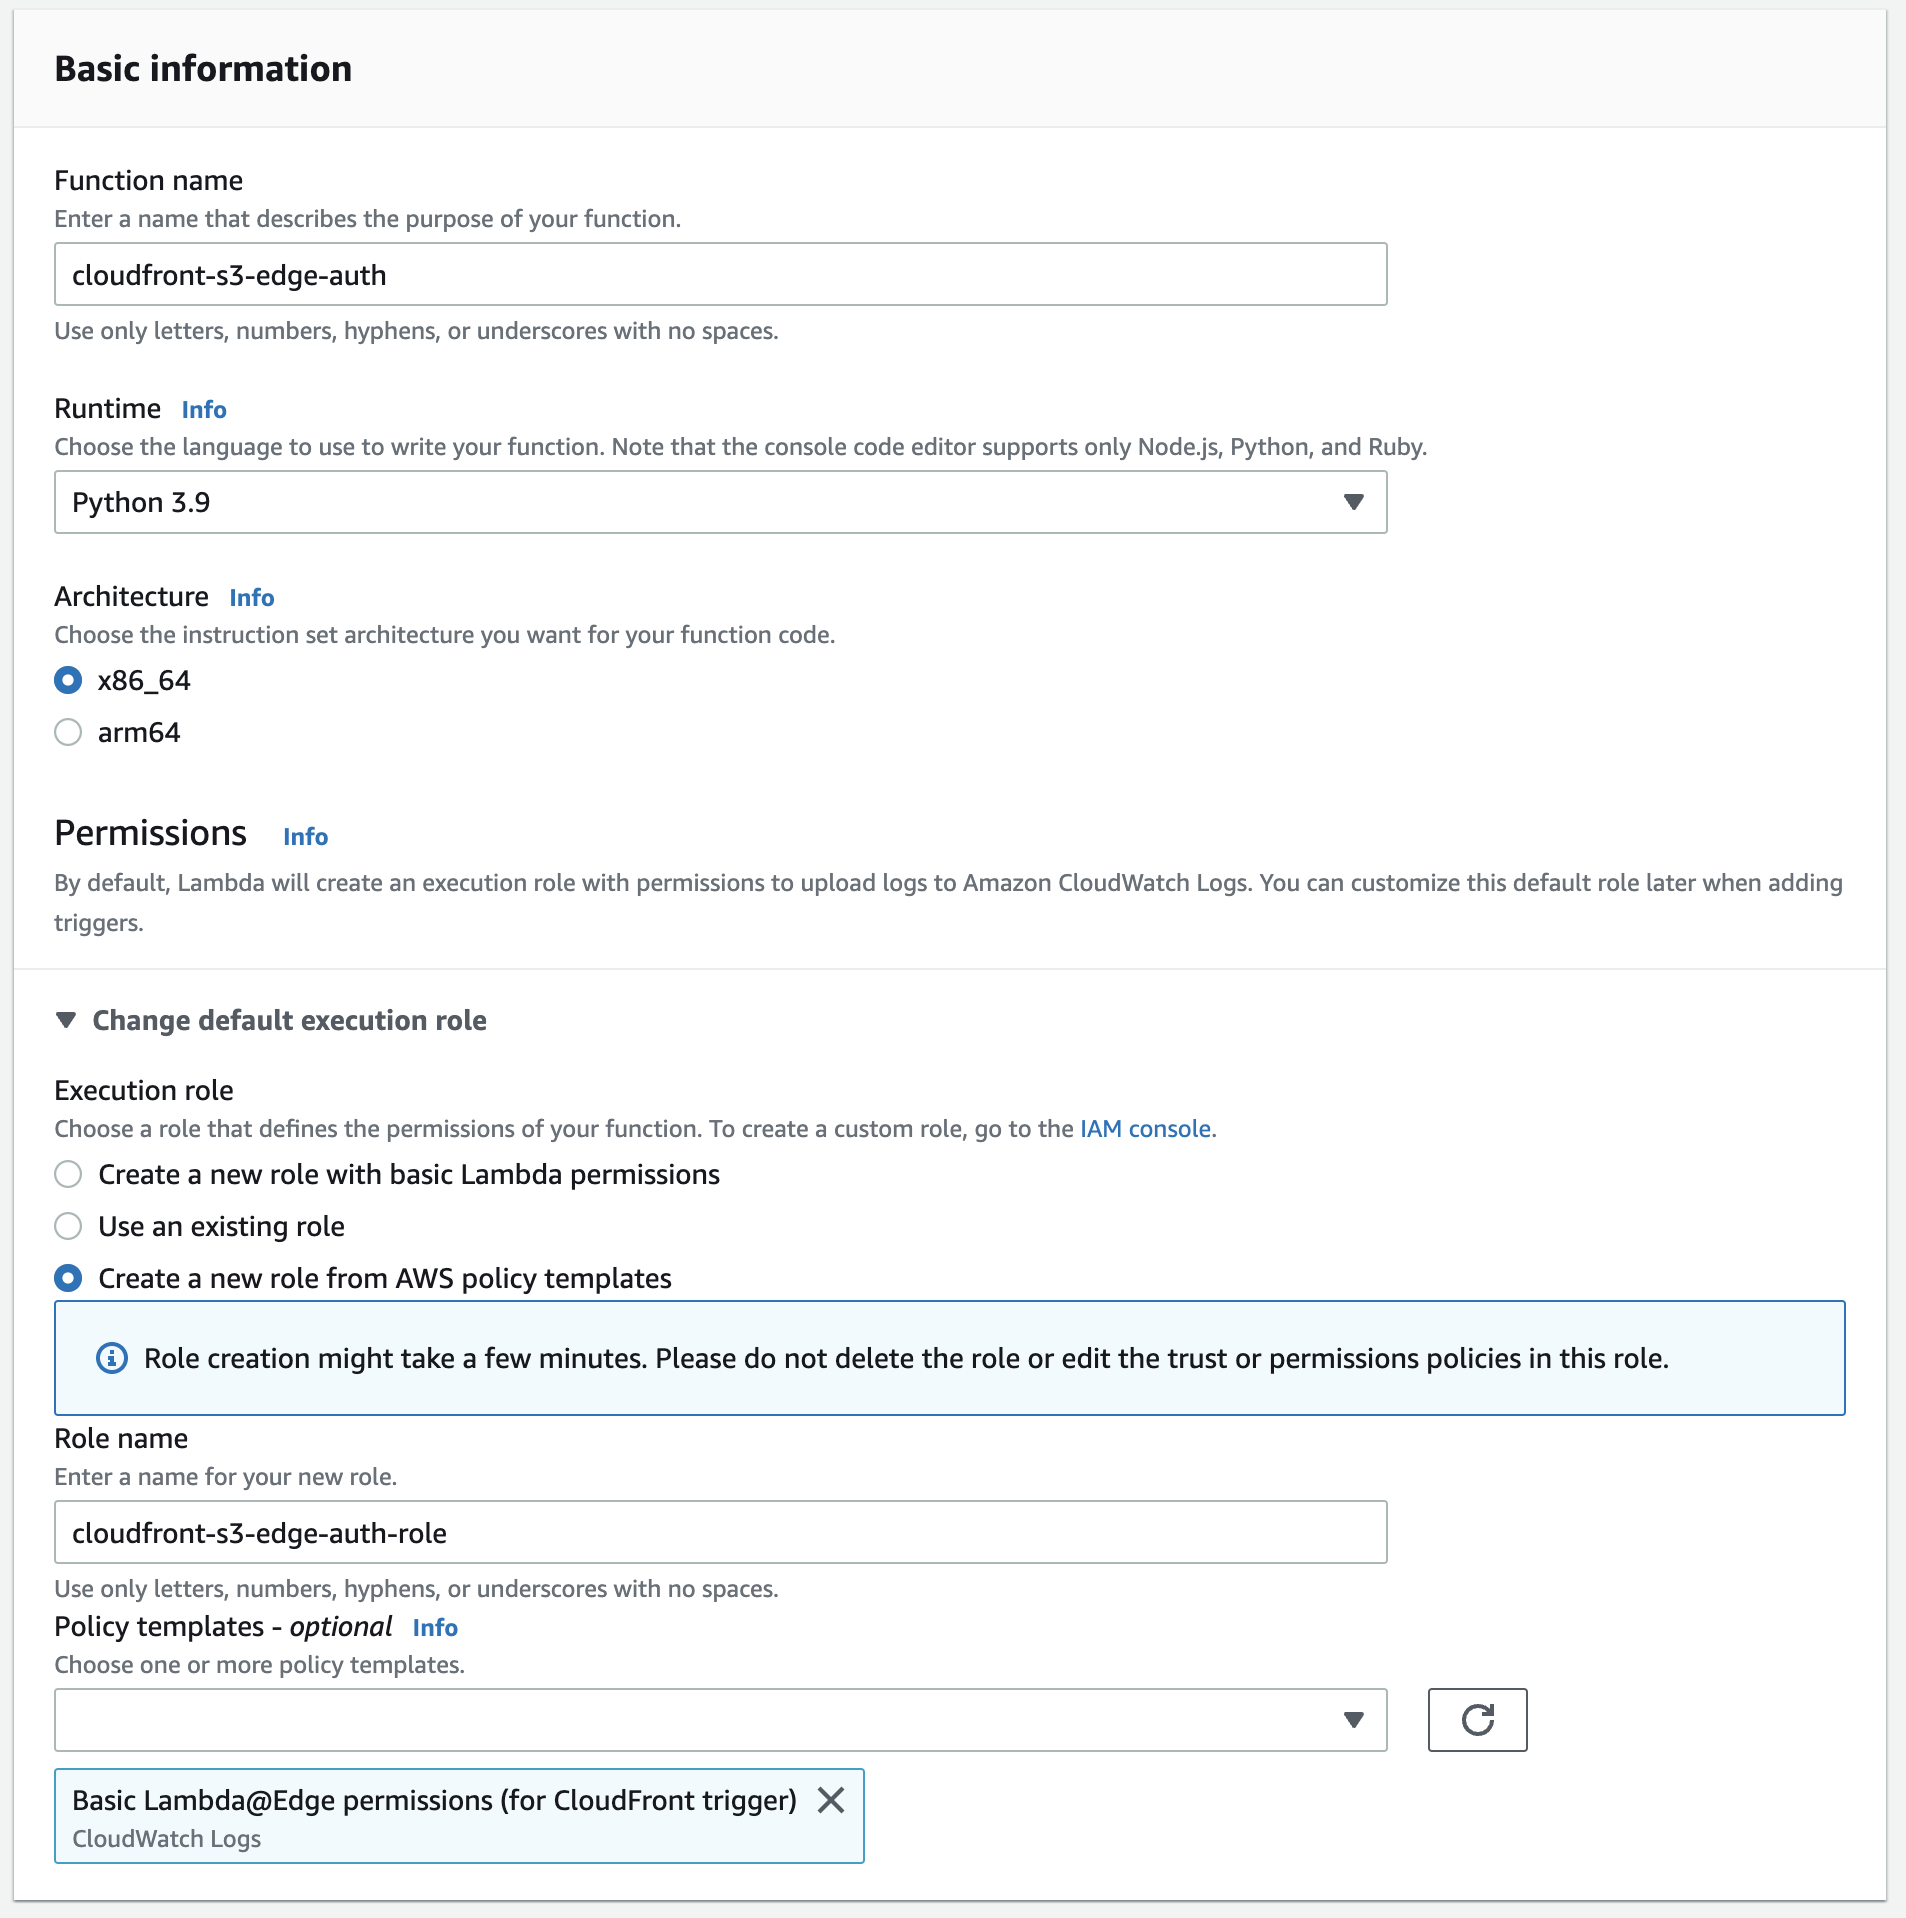
-
Copy the code below into your Lambda function. The code is very basic and checks to see if
my-secret-keyis present in theAuthorizationheader in the HTTP request made by the client. In production you may want something more secure, such as validation of a JWT against an identity provider such as Amazon Cognito, Auth0, AzureAD or Okta.import json def lambda_handler(event, context): print(event) response = event["Records"][0]["cf"]["request"] headers = response["headers"] if 'authorization' not in headers or headers['authorization'] == None: return unauthorized() if headers['authorization'] == 'my-secret-key': return request return response def unauthorized(): response = { 'status': "401", 'statusDescription': 'Unauthorized', 'body': 'Unauthorized' } return responseBelow is an example of the event payload sent to the Lambda function
{ 'Records': [{ 'cf': { 'config': { 'distributionDomainName': 'a1b2c3d4e5.cloudfront.net', 'distributionId': 'ABCDEF12345', 'eventType': 'viewer-request', 'requestId': '0nPLqasQLuZYzFShnLdVMPTFP97BMufYc786E5J3yWZVdrUBDWoz0Q==' }, 'request': { 'clientIp': '185.104.136.29', 'headers': { 'host': [{ 'key': 'Host', 'value': 'a1b2c3d4e5.cloudfront.net' }], 'user-agent': [{ 'key': 'User-Agent', 'value': 'PostmanRuntime/7.28.4' }], 'content-length': [{ 'key': 'content-length', 'value': '57' }], 'accept': [{ 'key': 'Accept', 'value': '*/*' }], 'content-type': [{ 'key': 'Content-Type', 'value': 'application/json' }] }, 'method': 'PUT', 'querystring': '', 'uri': '/response.json' } } }] } -
Click Deploy to save the function code.
-
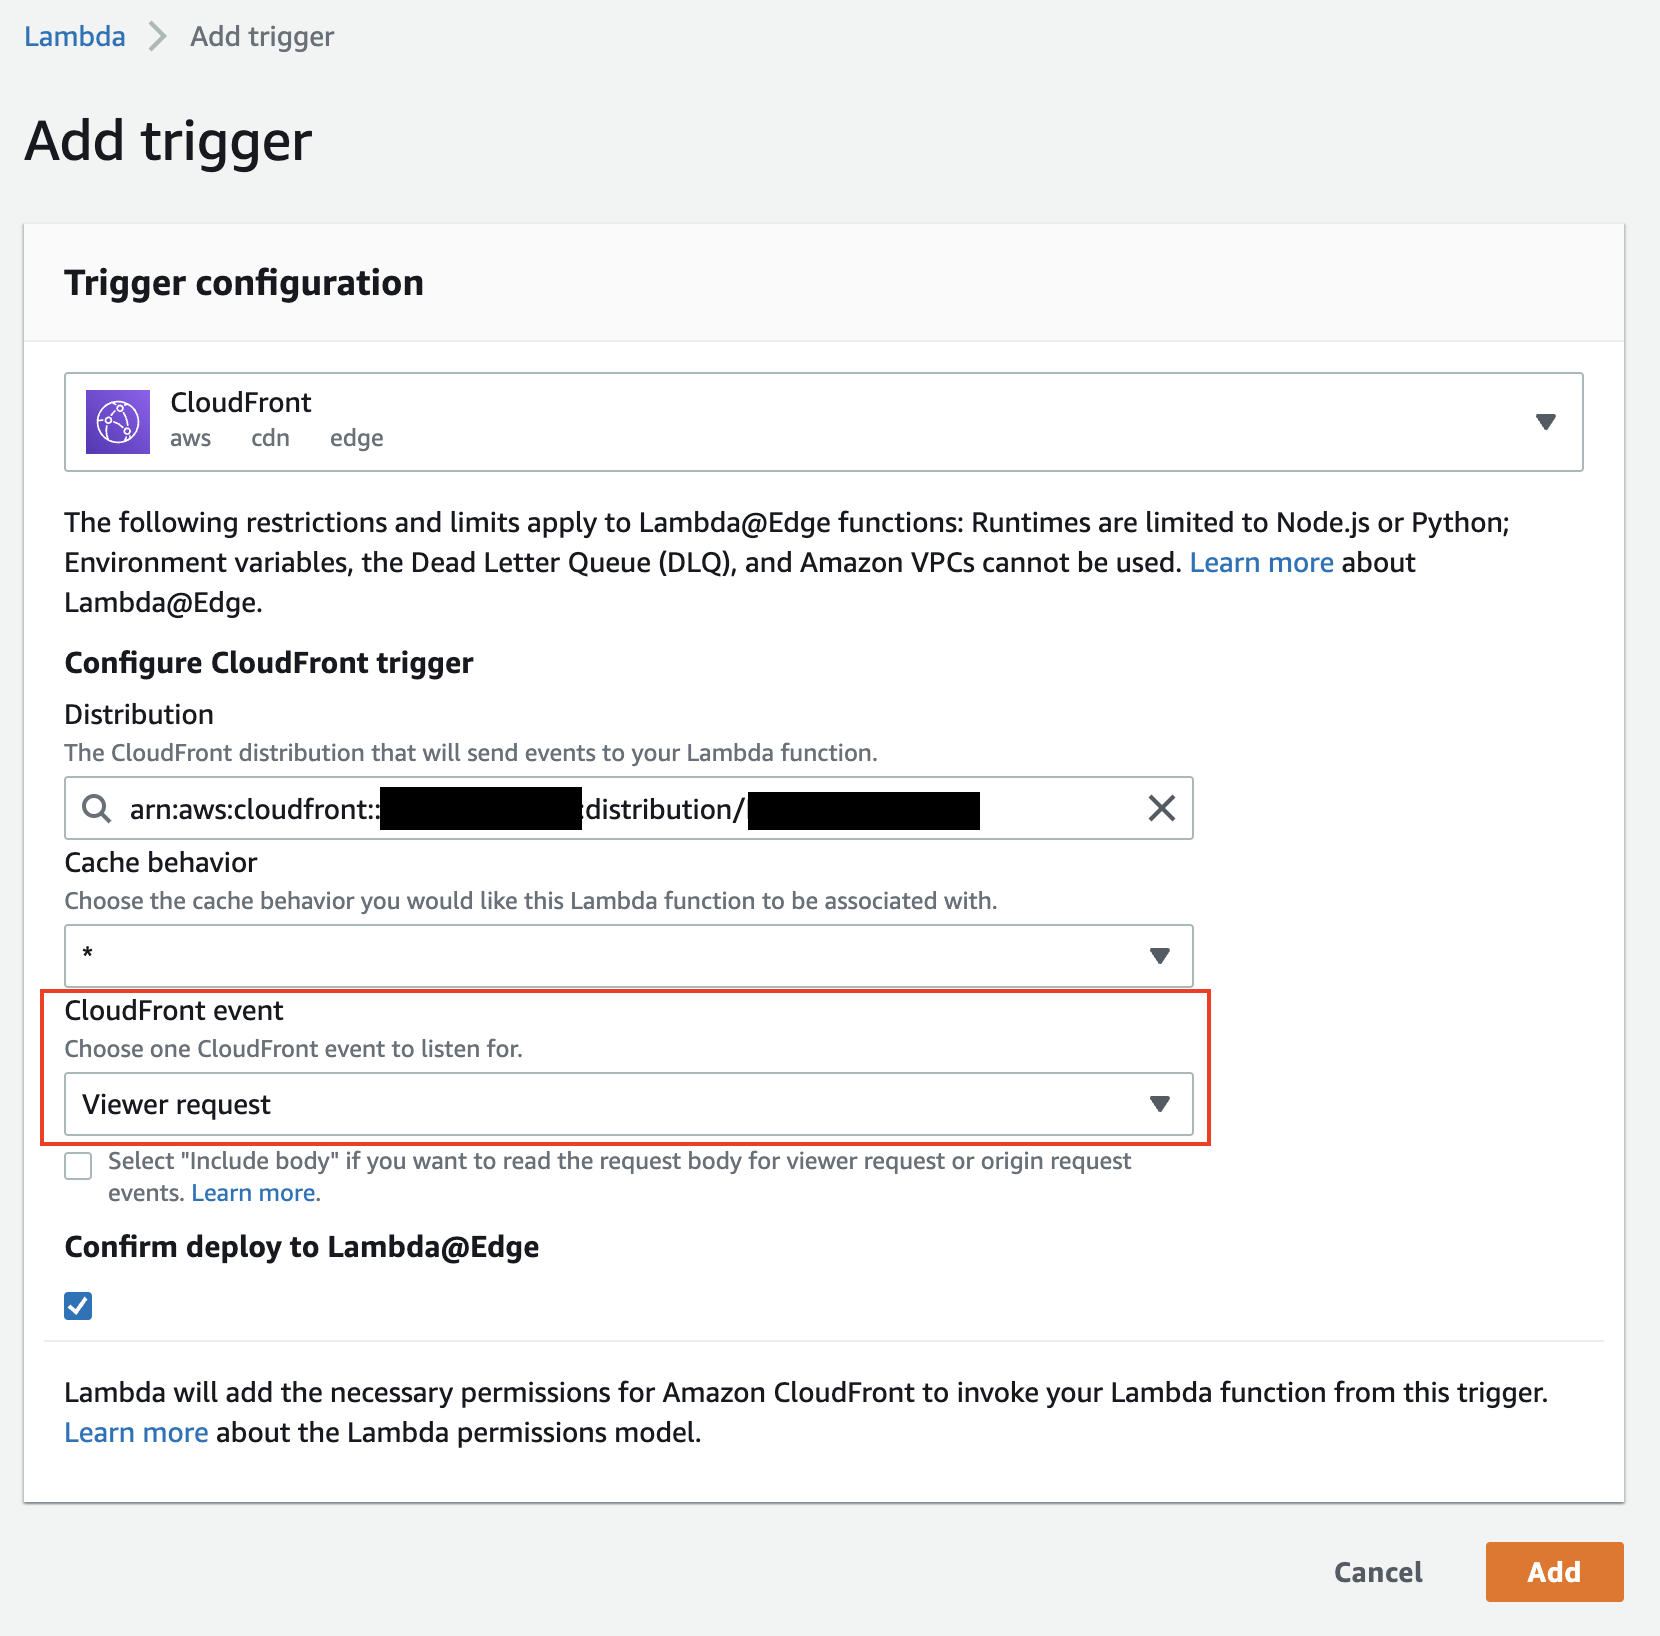
To associate the function to the CloudFront distribution click Add trigger in the Lambda function Console.
- Disribution = your CloudFront distribution created earlier
- CloudFront event =
Viewer request(we want to react to PUT events from the client)
-
Click Add and wait for the function to be deployed to the CloudFront distribution (this can take a few minutest).
-
All that’s left now is to test. Using Postman as before issue a
PUTrequest tohttps://<your-cloudfront-domain>/<object-name>with a binary payload as the body. You should recieve a401 Unauthorizedresponse this time.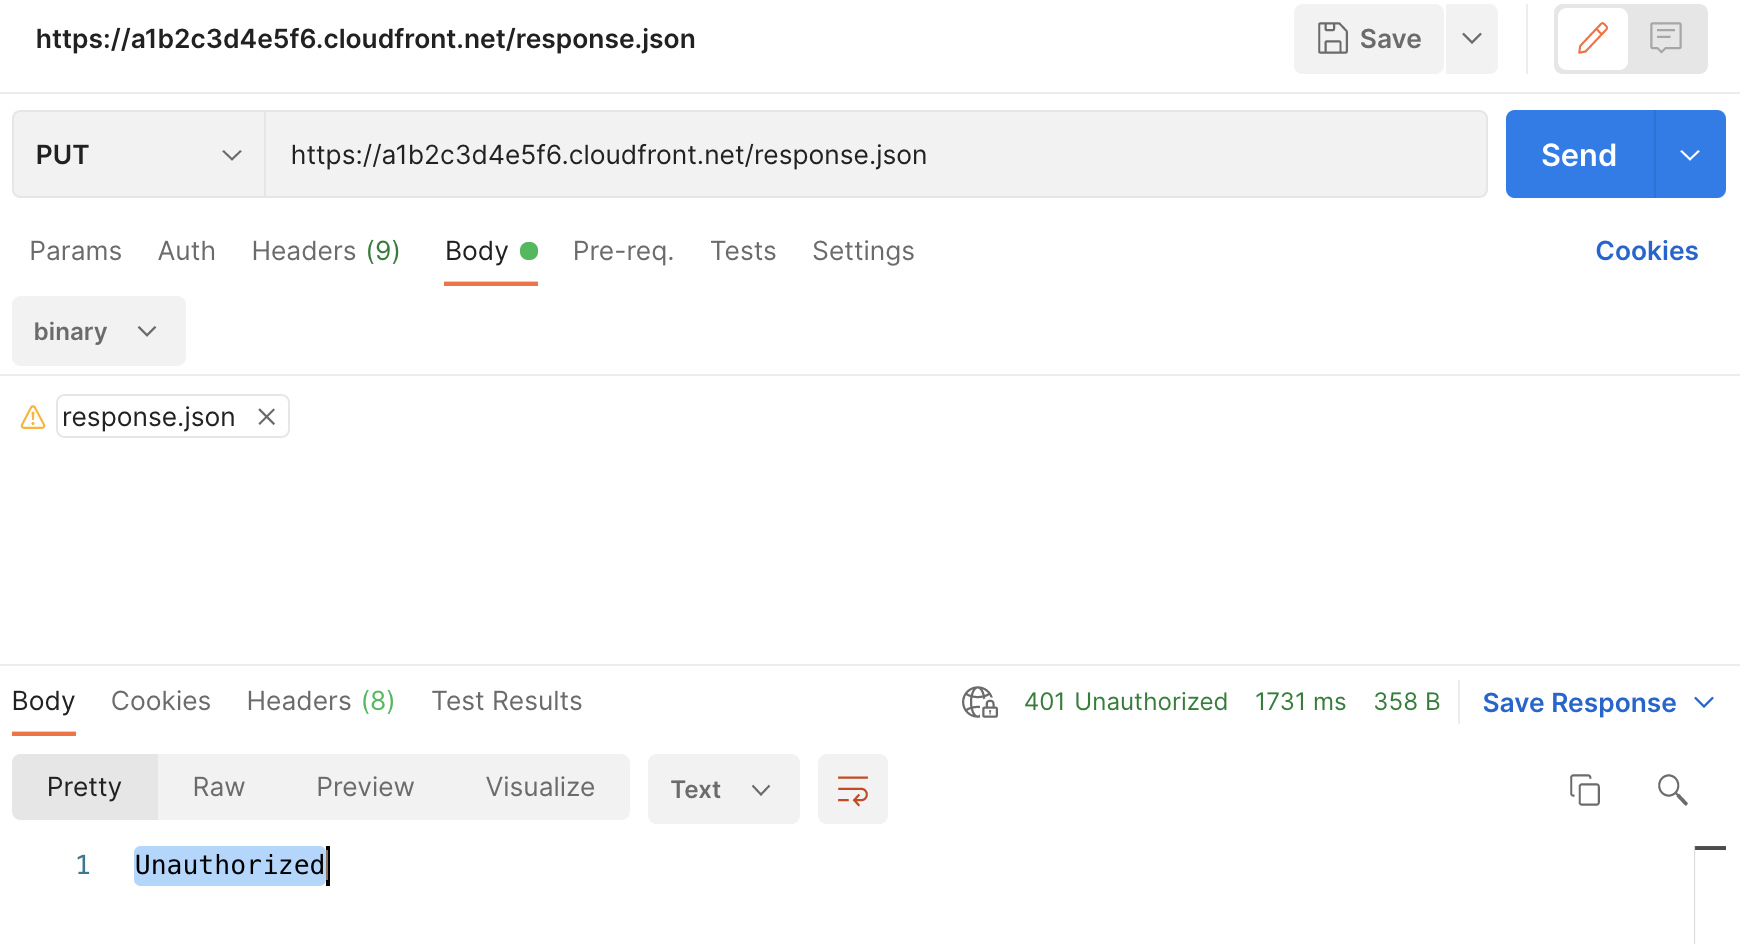
-
Next add the
Authorizationheader with valuemy-secret-keyand submit the request again. This time the request will work and you should recieve a200 OKmessage.
Note: if you want to check the Lambda logs for Lambda@Edge functions you will need to look in the region closest to the request, and not the same region as the function. For me the logs appeared in eu-west-2 (London).